
Salt Creek Canyon
TRAIL STATS
Rich in archaeological treasures and natural wonders, a trip through Salt Creek Canyon in Utah is a feast for the eyes and the imagination. You’ll have the opportunity to see Native American pictographs and ruins, visit historic Kirk’s Cabin, and take an optional side trip to Angel Arch. Traveling the entire 21-mile length of this route requires a vehicle shuttle, and road conditions may necessitate 4WD or be impassable. Check with a ranger before you go.
We did not arrange for a vehicle shuttle, so the mileage and elevation stated above reflects our out-and-back route. We started at the north end at the Salt Creek gate and went as far south as the All American Man pictograph (one mile south of SC3), making the side trip to Angel Arch along the way. Then we returned the way we came. There are more sites south of All American Man that are worth visiting, including Kirk’s Cabin, but this post will only describe the ones on our route.
Trail Description
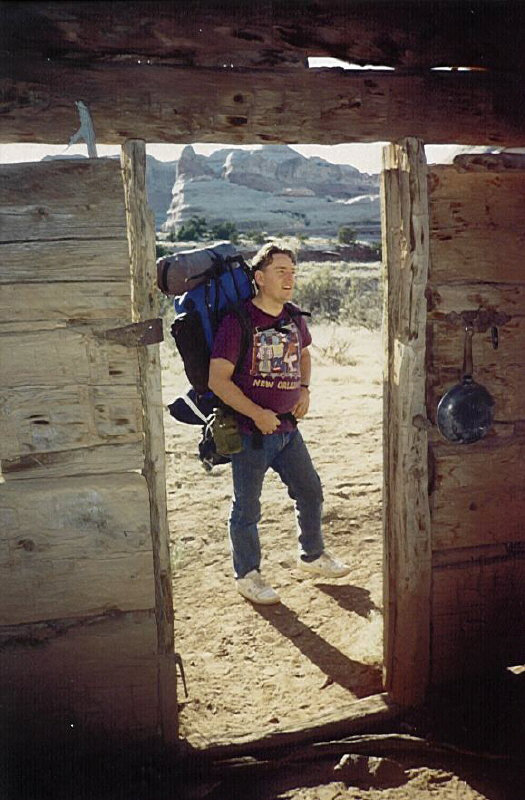
When I was young, my dad took my family on a backpacking trip into Salt Creek from the Cathedral Butte Trailhead. I vividly remember visiting Kirk’s Cabin and drinking from the creek, but when it came time to visit the All American Man pictograph, I stayed behind with my mom and youngest sister while my middle sister and my dad made the trip.
The way he talked about it always made me want to go back and see what I missed out on, and I have to say I’m glad I did. We all were because the pictographs in Salt Creek are really something special.
Photo: My dad at Kirk’s Cabin in the early 90s
Where to Park
Looking at the map of Canyonlands National Park, it seems like you could drive down Salt Creek Road and start at the Peekaboo Campground if you had 4WD and good clearance (it’s sandy and gets messy after rain). Wouldn’t that be nice? But alas, the ranger who issued my permit dashed my hopes. She told me there is no overnight parking for backpackers down there, and only people staying at the Peekaboo Campground can park there.
So that leaves you a couple options:
- Salt Creek Gate Hike 3.5 miles down a dirt road to the start of the trail. You can also shuttle your packs down to the beginning of the trail and then send whoever drew the short straw back to drop the vehicle at the gate. The road is sandy, so it can be kind of difficult to walk on.
- Needles Campground Hike 5 miles on the Wooden Shoe Canyon Trail to the Peekaboo Trail to the start of the Salt Creek Trail. The ranger said this involves a ladder and is more scenic since it’s an actual trail.
None of us volunteered to drop the vehicle back at the gate, and we didn’t want to take any extra time, so we all decided to carry our packs and hike the road. One reason we chose the road was to keep the last day’s distance to a minimum (we had to drive back to Phoenix afterward), and we kind of hoped we could hitch a ride with someone leaving Peekaboo Campground.
Salt Creek Road
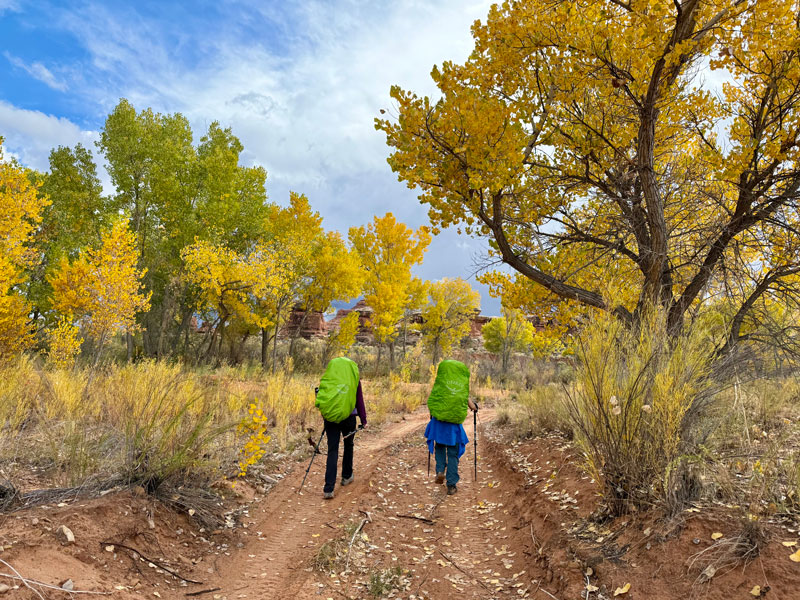
Usually I don’t like to hike along roads, but at least this one is pretty primitive with very little traffic. It’s mostly sand, which can be a bit of a nuisance, but the recent rain had made it firm and not too bad. As a bonus, the fall colors were vibrant in late October.
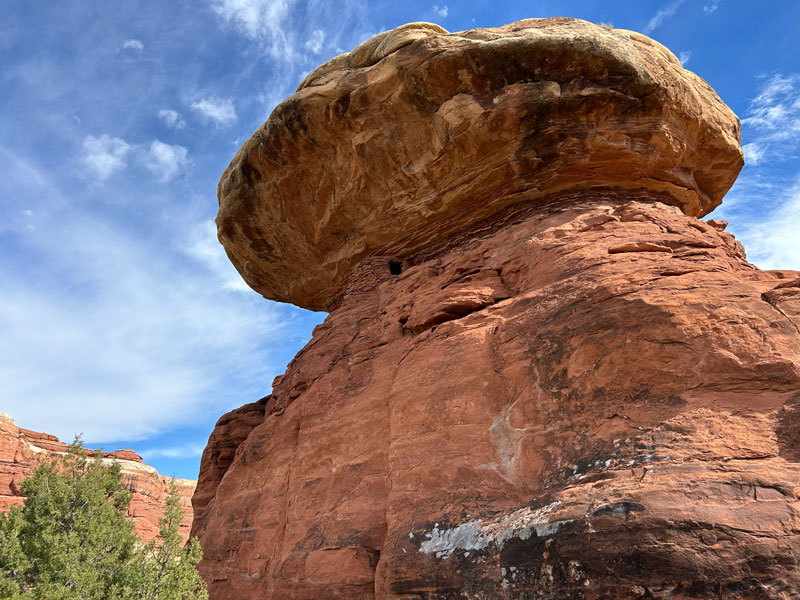
About 2.3 miles in, you’ll come to a fork in the road, and the right fork leads to Salt Creek. However, if you have some extra time, you can fork left for about a quarter mile to see a granary that is impossibly perched below the “cap” of a mushroom-shaped rock. How?
Walking just another couple hundred feet down the road, you can also see a natural bridge off to the left.
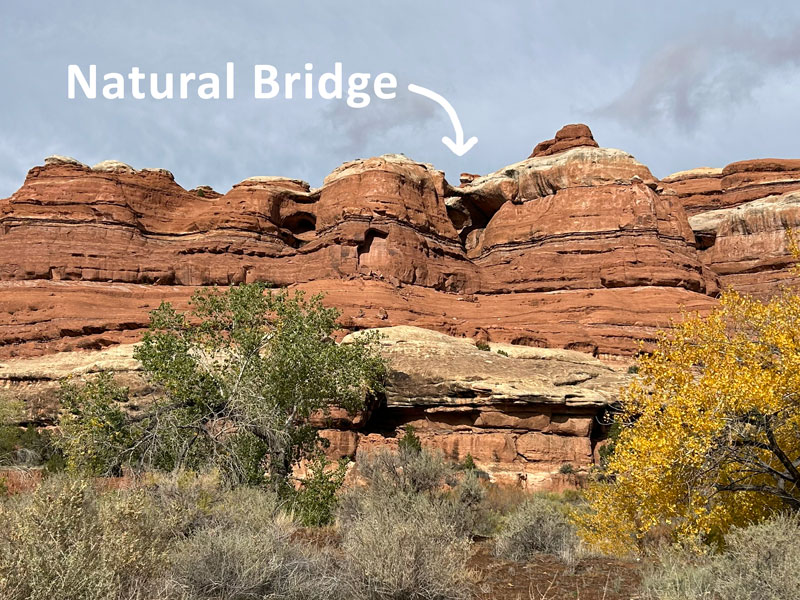
Wow, cool stuff already, and you haven’t even started the actual trail yet.
Trail Arch and Pictographs
Just before the Peekaboo Campground, there’s a sign marking a trail that splits off to the right and goes up to Trail Arch and some pictographs. Woohoo, you’re finally on a trail! An interpretive sign provides information about the pictographs.
Even though you will have to climb up some stairs, you definitely want to go this way because it’s cool, and going through the arch is a shortcut that cuts off a bend in the creek.
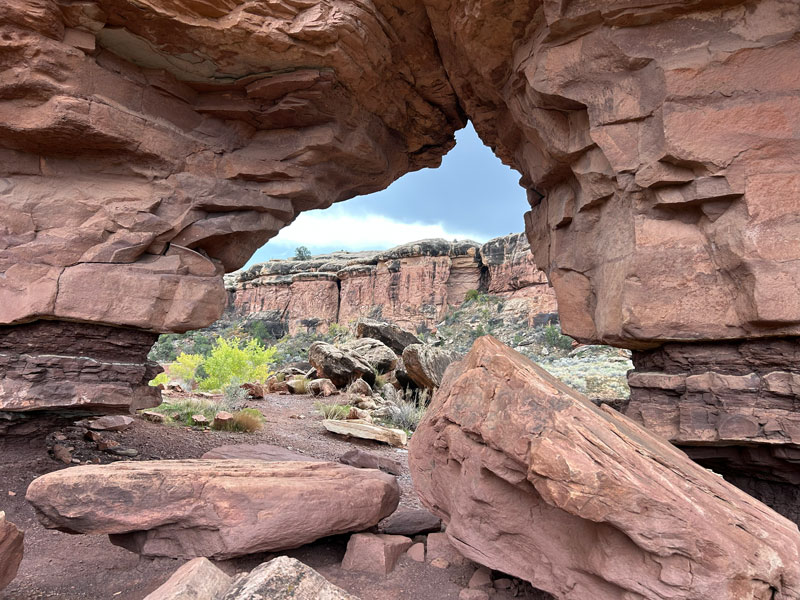
Once on the other side of the arch, you’ll drop back down toward Salt Creek, which is often completely dry. From here, the main idea is to follow the course of the creek, but staying on the trail can be the tricky part. There are spur trails breaking off here and there, some parts of the trail are overgrown, and crossing the wash is often particularly confusing. It can be helpful to keep an eye on the GPS, but we had the best luck when we kept a sharp eye for cairns, trail markers tied to vegetation, and footprints. Occasionally, the route will leave the creek to cut off a corner, so look for those little shortcuts too.
If you’re keen on seeing pictographs, and you should be because they’re remarkable, you’re going to have to veer off the main trail a little. Previous visitors have forged a path to these sites, but the trails aren’t always obvious. I did my best to record the paths I found, but my tracks may not be perfect. Use your best judgement (and for goodness sake, if you drop your packs, drop a flag there so you can find them easily in case it starts raining. Not that we’d know anything about losing packs in the rain – no, never).
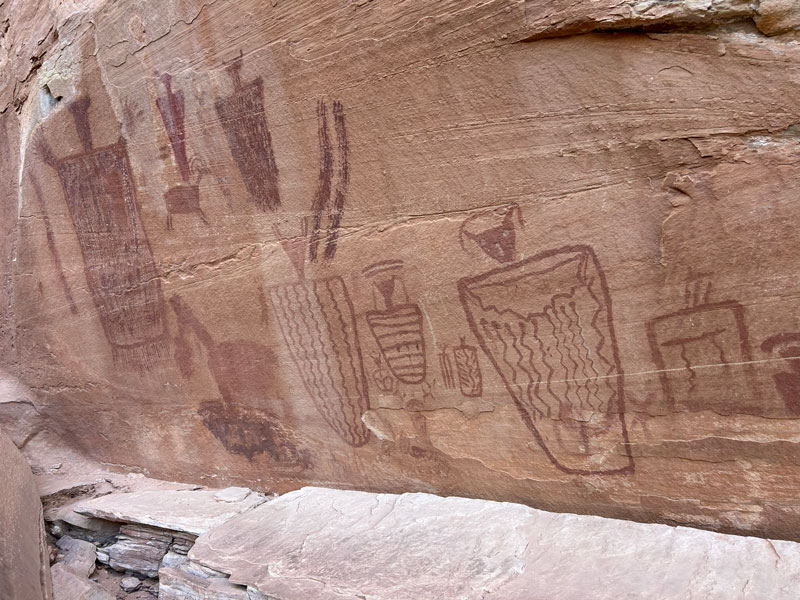
Flying Carpet Panel
If you don’t see any other sites on this list, go see this one! It was so cool! Almost 3/4 of a mile past the Trail Arch, there is a faint path that goes off to the right for Flying Carpet Panel. If you break off too early, you’ll find yourself in the unenviable position of having to try to get across a low wash and climb steeply up the other side. Be patient. The path we found leads up near a tree where we dropped our packs for the remaining short climb up there.
High Corner Panel
Once back on the trail, it’s almost a straight shot across the trail to a path that leads to the High Corner Panel. No, don’t look way up at the top like a fool. It’s not that high. Just high-ish.
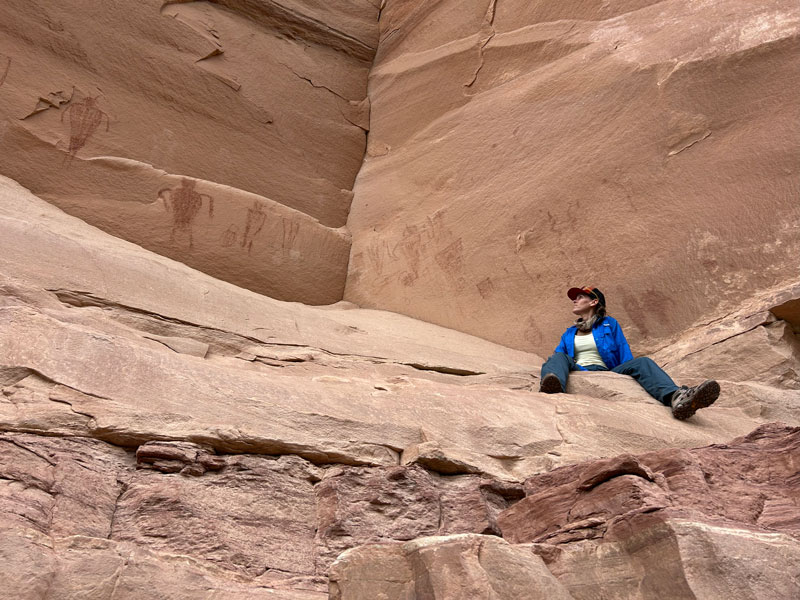
After having just viewed the Flying Carpet Panel, this one feels a little underwhelming. We were obviously very spoiled.
Salt/Horse Zone
Once you’re at least a mile away from the Peekaboo Campground, you’ll be in the Salt/Horse Zone, which is your first opportunity to camp if you have a permit for it. According to the ranger, you can camp anywhere in this zone, but be sure to stick to durable surfaces such as slickrock and sandy washes because there is a lot of cryptobiotic soil in the area. I marked a few of the spots that I thought looked pretty good, but just know that a campsite here usually means a flattish spot for a tent and that’s about it.
The best sites were a very large sandy area at the very far north end of the zone and a nice clearing with trees at the very far south end of the zone close to the junction for Angel Arch. Everything else we saw was “meh,” but you can make it work. If you find a good one that we missed, let us know in the comments!
We were running out of daylight and getting rained on, so we had to settle for a flattish bit of slickrock that was soaked and pock-marked with puddles. I have to admit it looked a bit better on our way back when it was more dry.
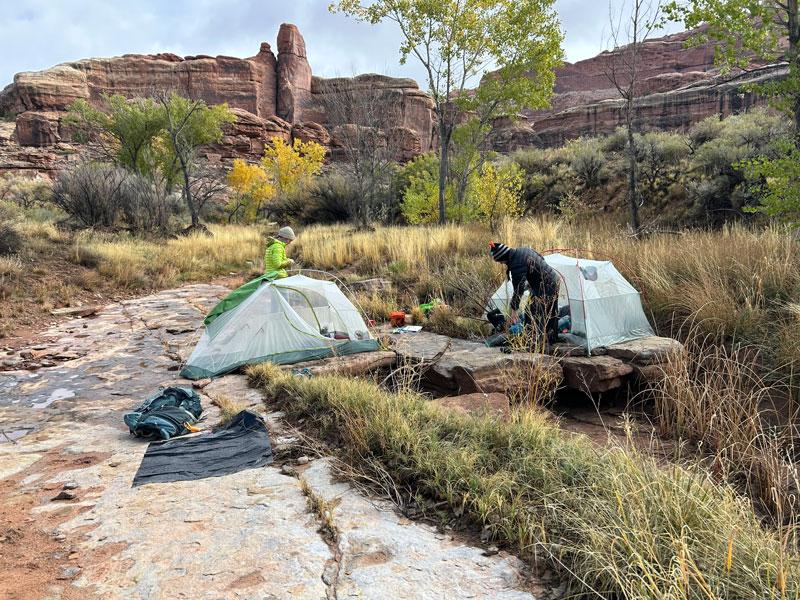
My tent door was that one on the far right, and I think I almost twisted my ankle a couple times getting off that little “cliff.” Fun times. But we stayed dry. Mostly.
Angel Arch
The Canyonlands park map shows 8.5 miles from the start of the trail at Peekaboo Campground to the junction for Angel Arch, but we measured 7.5 because of that handy shortcut at Trail Arch. The Angel Arch junction is down in an overgrown area, so keep your eyes out for the little sign.
What follows can be a fairly easy 35-minute hike over to the arch or a semi-bushwhack that takes almost an hour. The difference lies in whether you try to use GPS to stay on the “official” trail or you use your instincts and trail markers to follow the beaten path. I’d suggest the latter.
Either way, when you get to Angel Arch, it’ll take your breath away. It is so grand.
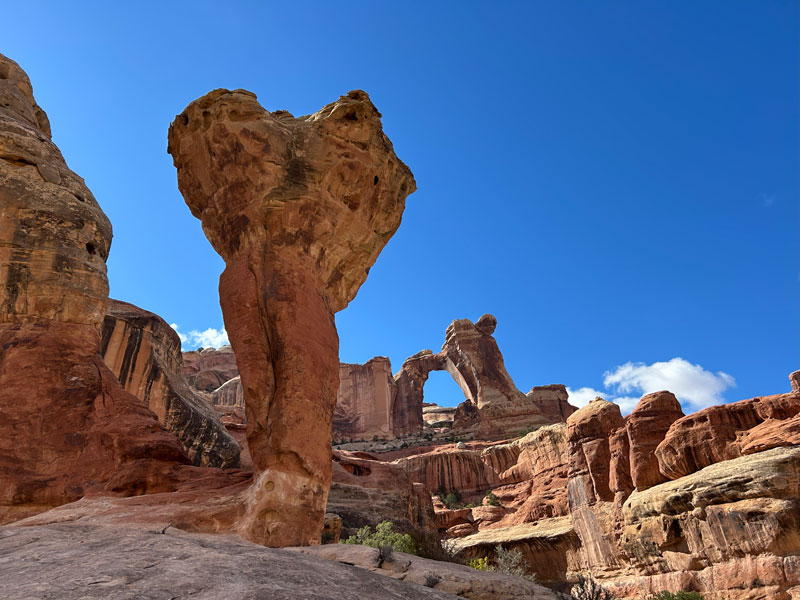
In the foreground is a formation known as “The Molar.” This spot makes a great place to take pictures and have a snack. The topographical map shows the trail continuing closer to Angel Arch, but we went as far as we could and found it to be disappointing. We couldn’t see the whole arch from there, and it was a little tricky at times.
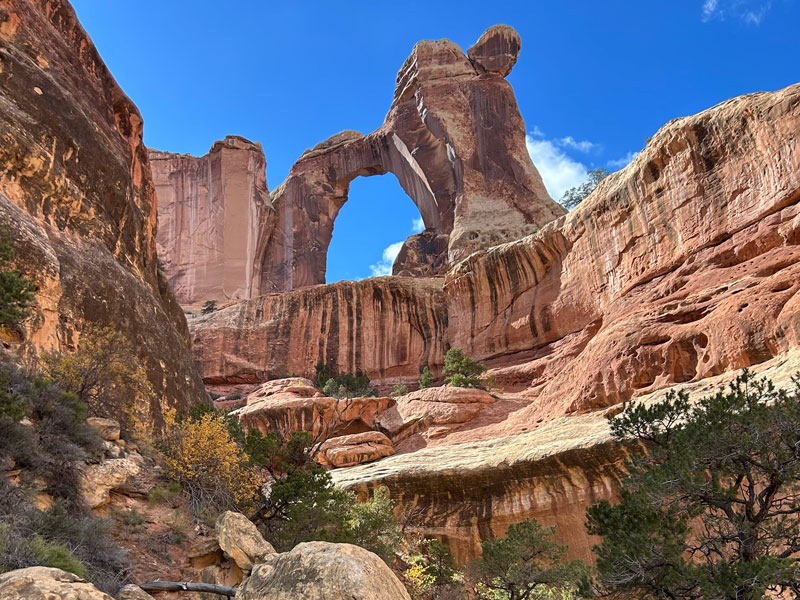
There is one viewing platform that might be worth it if you’re a completionist, but once you get to the view shown below, turn back. Really.
Back on the main trail, as you continue traveling south, you’ll leave the Salt/Horse Zone. This means you have to camp in designated sites only and use your wag bag, if needed. The Park Service requires everyone to carry at least one, so don’t forget to bring it!
The trail continues in much the same way it has for the last several miles, so the same basic principles apply. Follow the path of Salt Creek, look for cairns and trail markers, watch for footprints. There are lots of reeds, logs, branches, and other vegetation to get in the way. Try to avoid being the leader. That way, everyone else can reveal the tripping hazards and you won’t get blamed for wrong turns.
The SC4 campsite can be found along this section. We saw the sign for it, but we didn’t go up and check it out.
Five miles from the Angel Arch junction, you’ll come to a welcome sight—a spring!
Upper Jump Spring
This is one of the more reliable water sources in the canyon, but it can run dry, so be sure to ask rangers about current conditions.
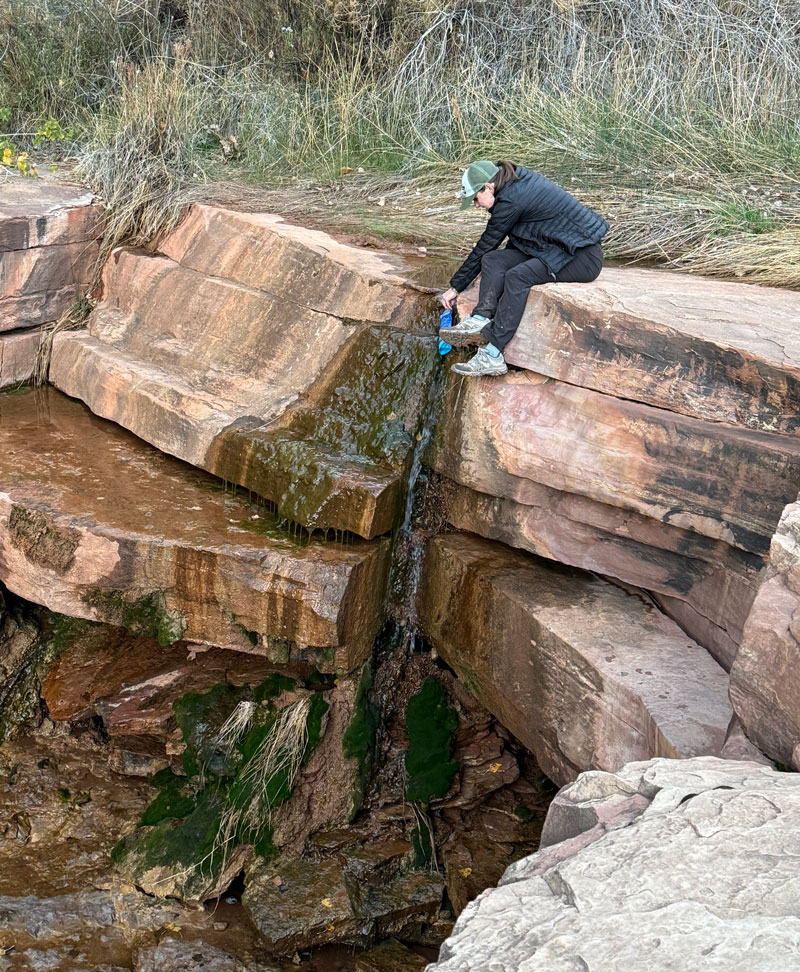
If you had to get water from a yellow pond with a suspicious film on top earlier, this will be a nice place to dump it all out and start over.
SC3
Not even half a mile farther, you’ll come to the best stargazing camp ever, SC3. This seems to be the most popular campsite, and for good reason because it positions you nicely between Cathedral Butte Trailhead and the Salt/Horse Zone. I hope you snagged a night here and that the skies are clear!

For our third day, we traveled a little farther south to visit the Four Faces pictograph and ruins and then continue on to the legendary All American Man.
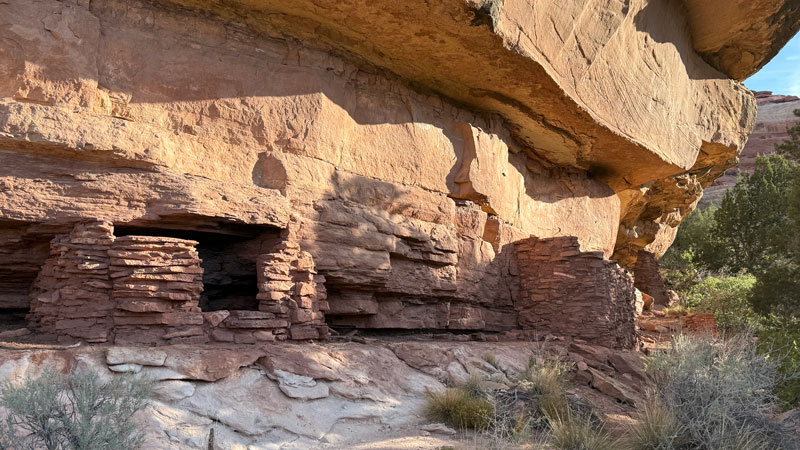
Four Faces Pictograph and Ruins
From SC3, it’s less than a quarter mile to the Four Faces Spring where you’ll cross over the water to visit the Four Faces pictograph and ruins.
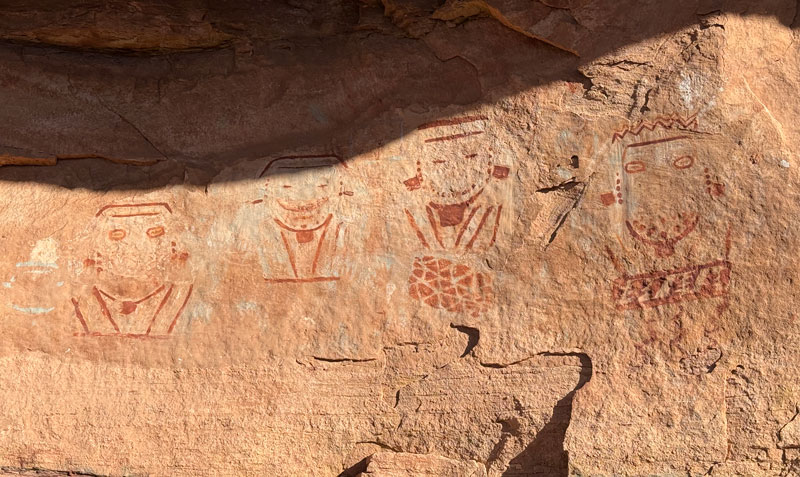
They’re so cute, aren’t they? The ruins are just below the faces.
This was a really cool site, and I wasn’t at all sure that All American Man would be able to live up to the hype I built up in my mind. But we had to try.
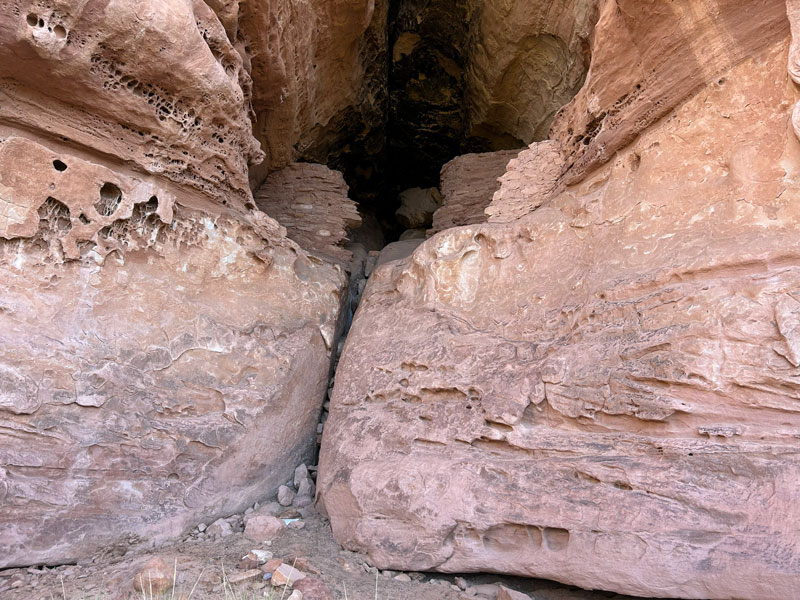
Continuing on the trail, you come to a large rock wall and will wonder where the trail is headed. It goes up close to the wall, then drops down a narrow chute to the other side. It’s along this next section where you’ll find the cave where All American Man dwells.
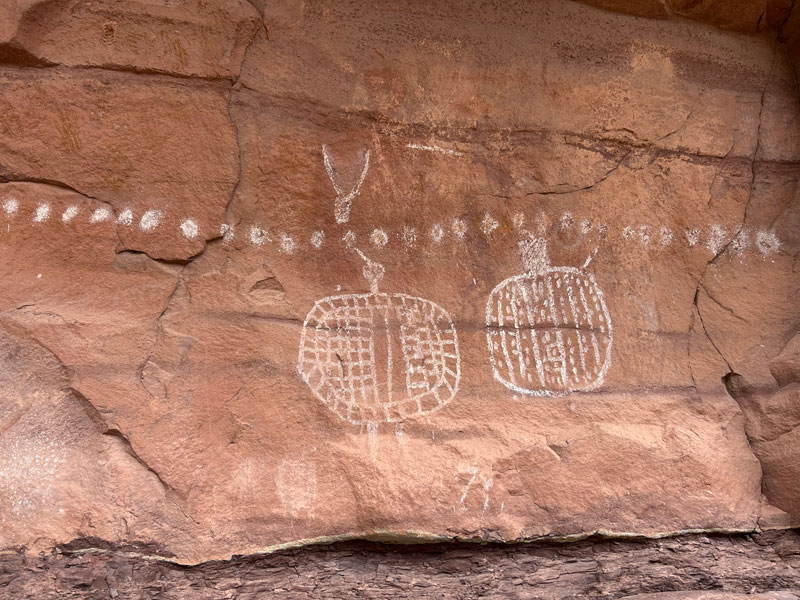
All American Man is a sensitive archaeological site that has suffered damage from careless visitors over the years. Entrance into the alcove is prohibited, but we found we could climb up the wall on the right a little way to get a better view without going inside the alcove.
There you are, finally!
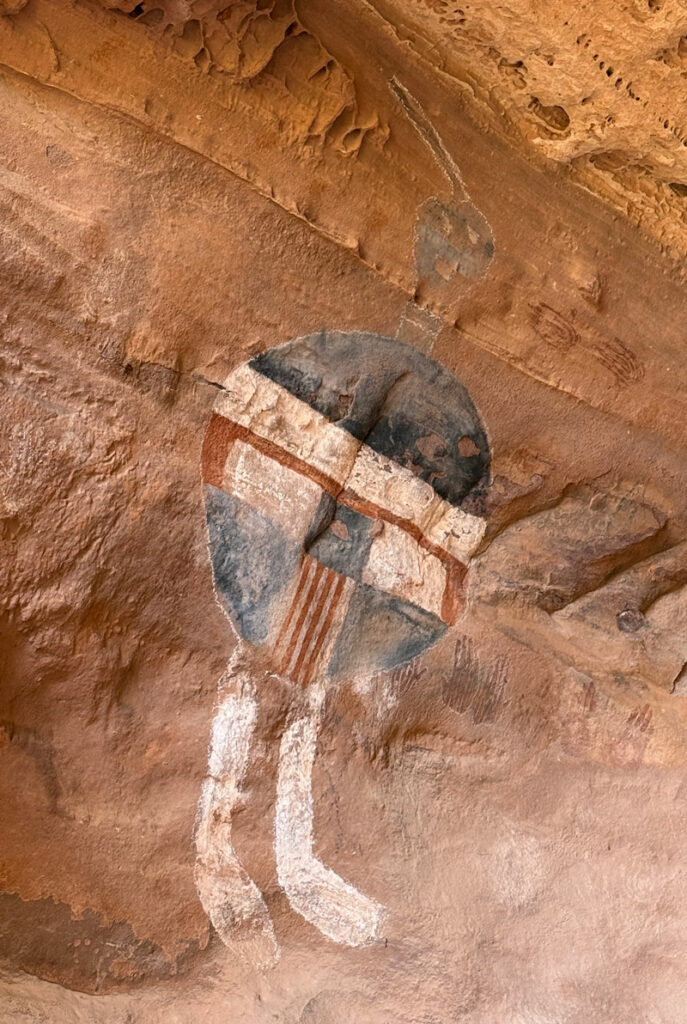
He was everything I imagined and more! I had a bit of a spiritual moment standing in his presence and thinking of my dad, who planted the seeds in me that grew into my love of the outdoors, hiking, and backpacking. It has blessed my life immeasurably.
Later, we looked up more information about this pictograph. Apparently, it has been the subject of debate as to its age and origin. However, we also learned that in the 1990s, they were able to scientifically date it to the 1400s. I noticed how similar the form was to the pictograph at the Trail Arch, so I’m a believer that it’s real.
Sadly, we could not work out the logistics for a shuttle to the Cathedral Butte Trailhead (it’s a long shuttle on a rough road, so it tends to be quite expensive!), so at this point, we had to head back the way we came. One day, I hope to see Kirk’s Cabin and the remaining archaeological sites in the canyon. That little passion in my heart that my dad inspired so many years ago keeps burning, and I’ll come back here one day.
Bears
The Park Service requires all backpackers in the Salt Creek area to store their food and scented items in a hard sided bear canister. When we heard that, we were a bit surprised because we have backpacked in many places that seemed more like bear country without needing one. The ranger informed me that we probably wouldn’t see a bear, due to their policy on canisters, but there was evidence of bears out there. So, I know it’s a pain, but rules are rules, and they protect you and the wildlife, so bring your canister!
Water
Salt Creek Canyon can become quite dry during periods of drought, and there may not be much water to be found. Check with the rangers for current conditions.
Pools If there has been recent rain, you may be able to find pools of water along the way. I marked a couple of pools on my map that had a good amount of water in them, but we did see other, smaller pools as well.
Springs Upper Jump Spring, Four Faces Spring, and Kirk’s Spring are all places where you might be able to find water.
Preview this Hike
Map & Directions
Location Canyonlands National Park, Needles District, Monticello, Utah
Google Maps Salt Creek Trailhead
Fees/Passes You need to pay an entrance fee to enter Canyonlands National Park or use your America the Beautiful pass. In addition, you need a backcountry permit for overnight camping in the Salt Creek area.
Trailhead Facilities None, but there are restrooms and water at the Needles District Visitor Center.
Recommendations for you
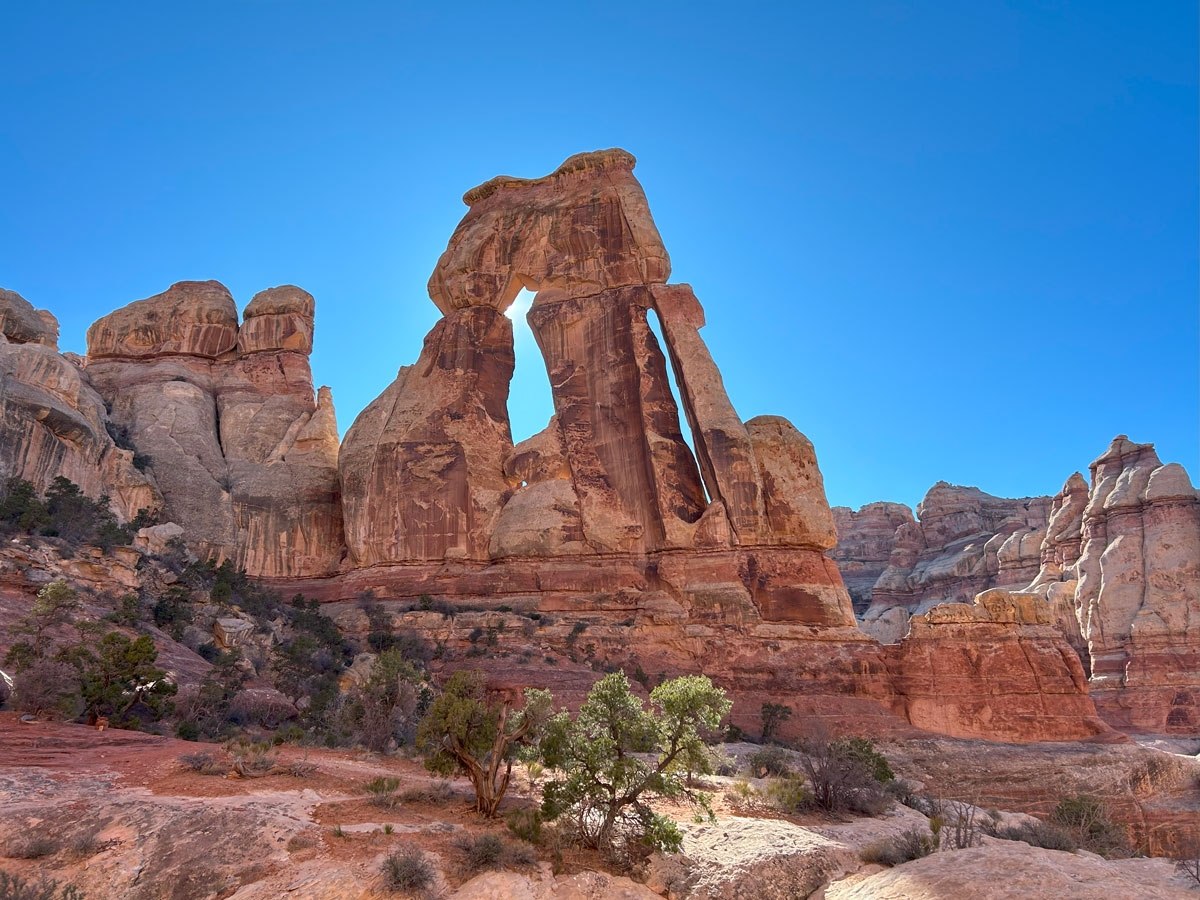
Druid Arch with Chesler Park | Canyonlands Nat’l Park
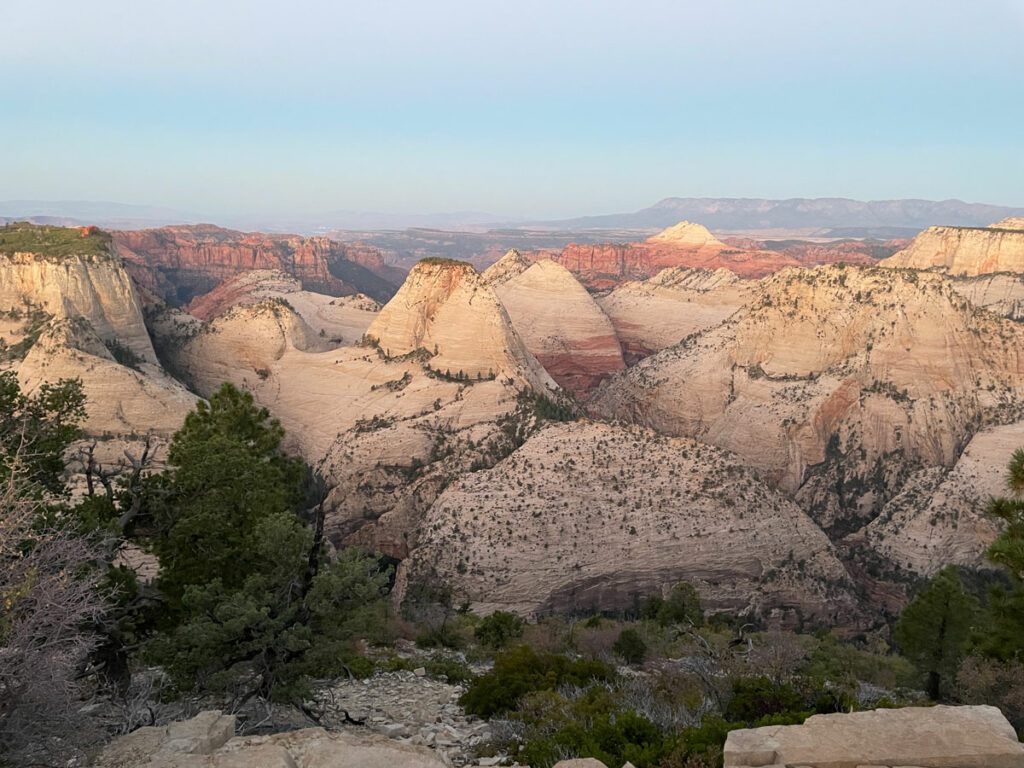
Zion Traverse | Zion National Park

Fiery Furnace | Arches National Park
Leave a Reply