Escalante Route
TRAIL STATS
If you love epic views of the Grand Canyon, few trails can match the Escalante Route. This trail, which stretches between Tanner Beach and Hance Rapids along the Colorado River, offers beach camping, panoramic views of the river gorge, and an engaging trail that passes through a slot canyon. Few will ever forget climbing the Papago Wall or descending the Papago Slide as they make their journey along this incredible route. Access to this route is provided by the Tanner Trail and New Hance Trail, although you do have the option to extend it to the Grandview Trail or beyond. Trail conditions can be quite rugged, so this is recommended for experienced hikers.
Trail Description
My obsession with backpacking the Grand Canyon has grown over the last couple years as I have discovered unparalleled experiences on Thunder River, Nankoweap, and South Kaibab to Hermits Rest. Each one, though part of the same canyon, offers a unique and sublime experience that only leads me to seek my next Grand Canyon thrill. Escalante Route was no different. While those other routes are spectacular in their own ways, they only offer a small taste of what the Escalante Route provides in unmatched abundance: expansive views of the Colorado River gorge.
If you’ve done any research at all about this route, you’ve undoubtedly heard of the infamous Papago Wall and Papago Slide. You also may have heard about New Hance Trail being rugged and hard to follow. For experienced hikers, these obstacles should not pose any serious problem, and I will walk you through our experience with each. The bottom line is: this route is worth the trouble, but be prepared.
Trail Options
The Escalante Route can be done in either direction, but the National Park Service information page says that it’s appealing to “travel with the flow of the land,” meaning east to west as the river flows. This is the direction we went, so this guide will also describe hiking in this direction.
Every itinerary for this route will either ascend or descend Tanner Trail, but you have a choice of trails on the other end. Technically, the Escalante Route only extends between Tanner Beach and Hance Rapids, but you have the option to continue on the Tonto Trail to access other trails that go to the rim.
- Tanner/New Hance The shortest, most direct route for this hike is to take the Tanner Trail on one end and the New Hance Trail on the other. This is the route we took.
- Tanner/Hance Creek/Grandview To extend your adventure, you can continue on the Tonto Trail to the Hance Creek Trail, which goes up to Horseshoe Mesa. From there, you can exit on the Grandview Trail. The benefit to this option is that the Grandview Trail was once a mining trail and is practically paved with cobblestone much of the way up. Fancy!
- Other Options The Tonto Trail continues beyond the Grandview Trail, so you can extend your trip even longer by continuing to South Kaibab, Bright Angel, or Hermit Trail.
Although we did not hike the Grandview, South Kaibab, Bright Angel, or Hermit Trail on our adventure this time, we have hiked each one before, so you can get an idea of what to expect by reading the other articles I linked. For the hardcore people out there (you know who you are), there are a few more options beyond Hermit Trail, but I have not hiked those yet, so you’re on your own for those.
Car Shuttle
No matter which trails you use for this route, you will need two cars for a car shuttle, or you can hitchhike. There is no public shuttle service to the viewpoints along Desert View Drive. According to the ranger we spoke with, you can park overnight at Lipan Point, Moran Point, or Grandview Point. However, there is no parking at any time at the New Hance Trailhead. We opted to leave our vehicle overnight at Lipan Point and hitchhike the 6.5 miles back to our vehicle when we exited at New Hance. At 4pm, there were plenty of vehicles passing by, and we got a ride within 5 minutes.
Water
Whenever you embark on an adventure in the Grand Canyon, you need to know where you’re going to get water. For this route, your primary water source will be the Colorado River. After precipitation, you may find water a mile or so up the New Hance Trail, but that’s about it. The river can become quite silty at times and difficult to filter. We didn’t know what to expect, so we came prepared with a few options:
- 4L dirty water bag to fill and let settle overnight. This proved to be the most useful.
- Handkerchiefs and/or coffee filters to pre-filter the water. Since the water was not too silty when we went, we didn’t need to use this option.
- Alum to bond with the sediment and help it settle. My friend tried this and found it to be unpalatable.
Thankfully, the water was green (not brown) when we went, and we didn’t have too much trouble filtering directly. We did have to backflush a bit more often than normal, but it wasn’t too bad. I would recommend bringing a couple options if you can. The river may be silty when you go, and you might not always have time to let the water settle overnight.
Lipan Point
If you’re starting this route on the Tanner Trail, your journey begins at Lipan Point. There was significant snowfall a little more than a week before we went, so we all packed foot traction just in case. The ranger at the Backcountry Information Center told us the Tanner Trail is one of the last to melt out, and it’s also very steep, so she said we would want foot traction. Once we got to the trailhead, we realized there was very little snow left, so we made a decision to leave our traction in the car. We were not sorry about that! Well, I was because I was the only one to carry it anyway.
Tanner Trail
The first mile of Tanner Trail drops more than 1500 feet of elevation. Yowza! Hiking poles are a critical piece of gear for staying balanced while making big steps down.
Not too far down, a ranger caught up to us and checked our permit. I rarely get a permit check on the less popular trails of Grand Canyon, but it does happen, so don’t leave the parking lot without it!
After the first mile, the trail becomes significantly less steep, but more exposed to sun. This flatter (and sometimes slightly uphill) grade continues for around two miles. Walking out onto a narrow ridge is one of the coolest spots on this trail with views into the canyon on your left and right.

Up ahead are some flat areas that may be suitable for a dry camp about 3.5 miles in, but the trail heads to the right and begins descending again. Along this section, the views into Tanner Canyon are EPIC!

For the next four miles, you’ll continue on a steady downhill grade toward Tanner Beach. The topographical map I had gives a total distance of 9 miles from Lipan Point to Tanner Beach, but our GPS devices consistently recorded it at 7.5 miles. It took us just over six hours to complete this section with very lengthy stops to talk with the ranger about Grand Canyon rescues and to eat lunch, pee, and rest in the shade. When we were actually moving, we were usually going at around 2-2.5 miles per hour.
Tanner Beach
When you get close to Tanner Beach, you’ll find yourself in a wash. The official trail goes up onto the eastern bank (right side, when facing the river), but it’s shorter to stay in the wash if you want to make a beeline to the water. However, if you’re desperate to visit the toilet, you may want to follow the official trail. Since we were continuing on to Cardenas, we went straight to the river to drop our packs and soak our feet in the freezing water.

Toilet
A trail that comes out near the water led us back to the toilet when we wanted it. This is the last toilet until Horseshoe Mesa (if you’re going that far), so make the best use of it you can.
Campsites
If you have a permit for Tanner (BB9), you can camp along the Tanner Trail or at Tanner Beach. The best camp spots are just west of where the wash meets the river, on the opposite side of the wash from the toilet (yay!). I don’t have to tell you that the smell isn’t pleasant, so this is good news. We didn’t explore the area much, but a satellite view reveals an awesome looking beach about a quarter mile to the west just before the next river bend.
Escalante Route
Tanner Beach is the official eastern terminus of the Escalante Route. The next three miles will take you over to the beach at Cardenas Creek. There are a few ups and downs, but it’s largely flat and easy going terrain.
If you have a camping permit for Cardenas Creek (BC9), you’ll enter that zone around a mile past Tanner Beach. We didn’t notice any obvious places to camp there, though determined folks will surely find something. Plan to commit to the entire three mile distance from Tanner to Cardenas Beach if you’re not camping at Tanner.
From Tanner, the trail tends to move away from the river, higher up onto the cliffs. It’s dusty, and the vegetation isn’t much to look at, but the river and mountain views are nice.

Cardenas Beach
Right around 3 miles after you leave Tanner, you’ll cross the dry creek bed of Cardenas Creek. This creek is really just a drainage that only flows during flash floods or, rarely, during snow melt. So don’t let the word “creek” fool you. Soon after, there’s a small spur trail off to the right that will take you over to Cardenas Beach. It’s a fantastic little spot to watch the day end and begin again.

Back on the Escalante Route, the trail makes a turn to the south and starts going up. Don’t be sad about it because going up means views!
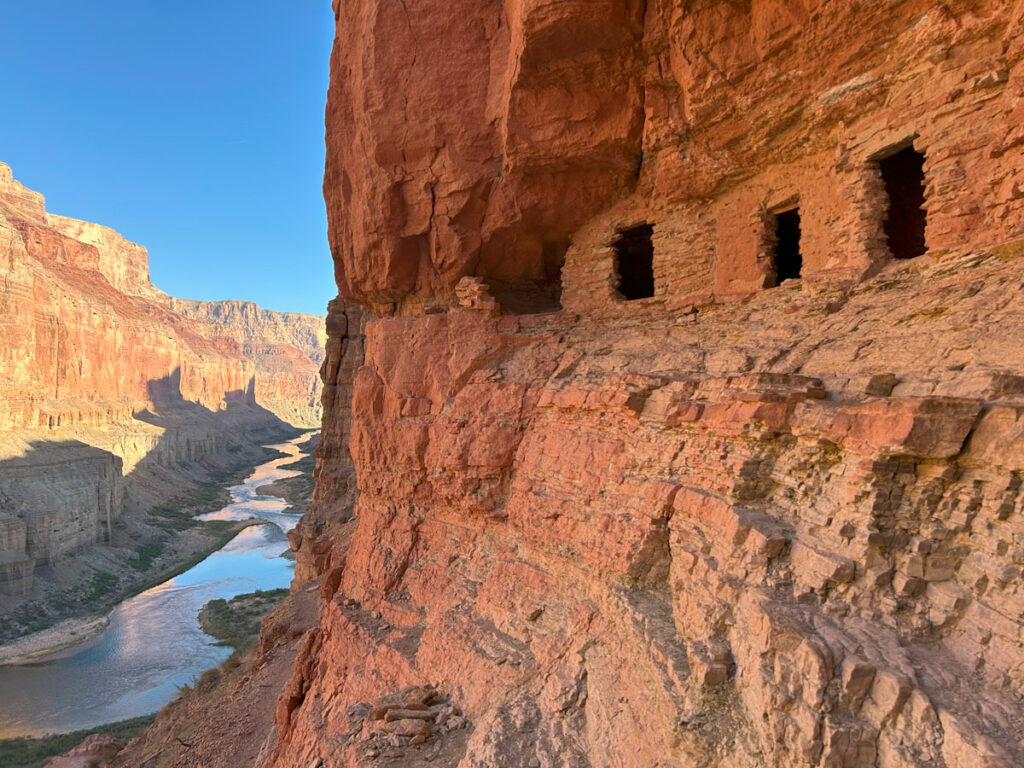
Hilltop Ruin
Up on the high point to your left as you are coming around that turn is Hilltop Ruin, an Ancestral Pueblo site. We were too focused on the trail ahead to make a stop, but I located it on the satellite view and marked it on the map provided below. If you decide to visit, please take care not to disturb the ruin in any way.
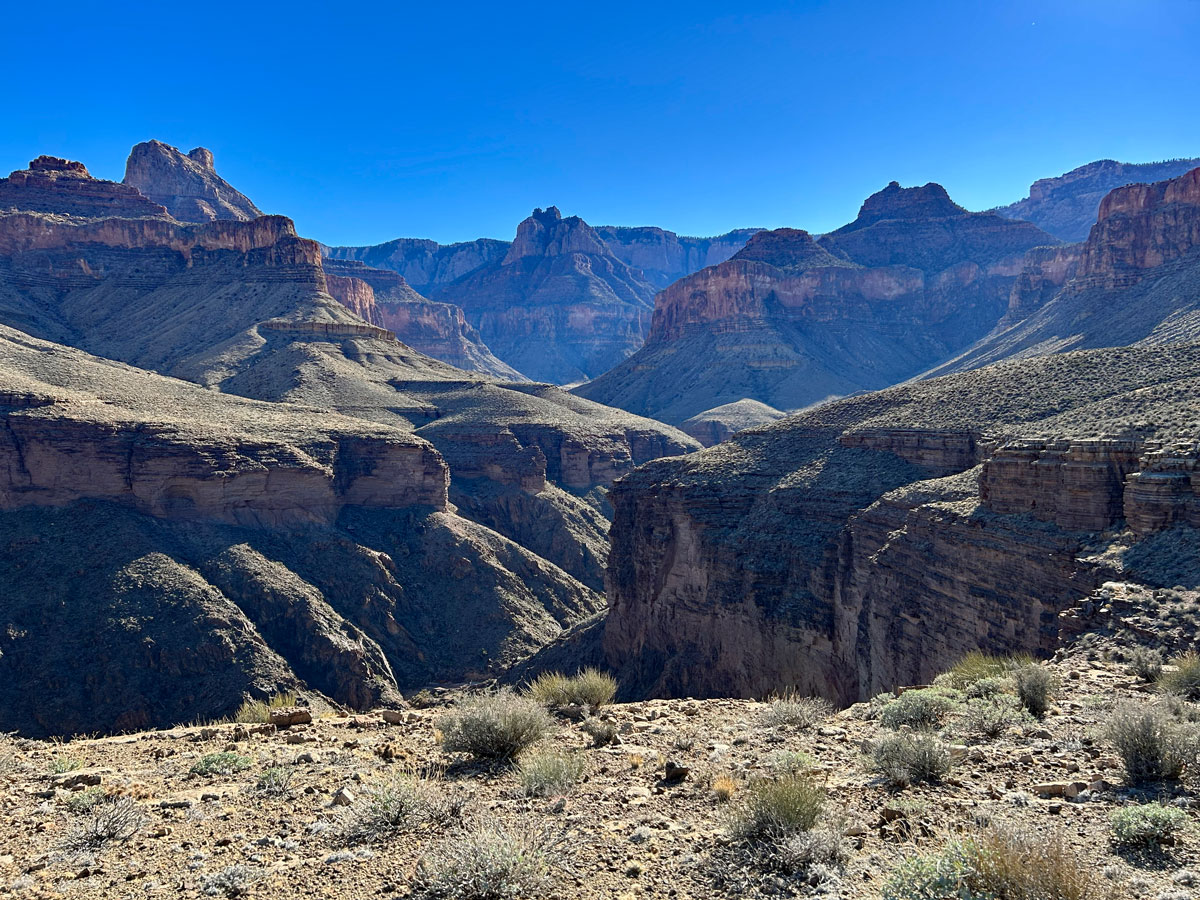
Views! Views! Views!
A mile past Cardenas brings you to one of the best viewpoints along the trail: a dramatic cliff that drops more than 500 feet down to the river. The trail doesn’t go right up to the edge, but you should (I mean, within reason). It’s awesome!

Right after that, the trail very obviously heads up and away from the river. It may seem annoying, but I am here to tell you that some of the best views I have seen ANYWHERE in the Grand Canyon can be had along this section. Be patient, my friend!

The trail stays at a relatively consistent elevation as it curves around the contours of the canyon. Along this section, you’ll have view after magnificent view! I marked some of my favorite spots on the map.
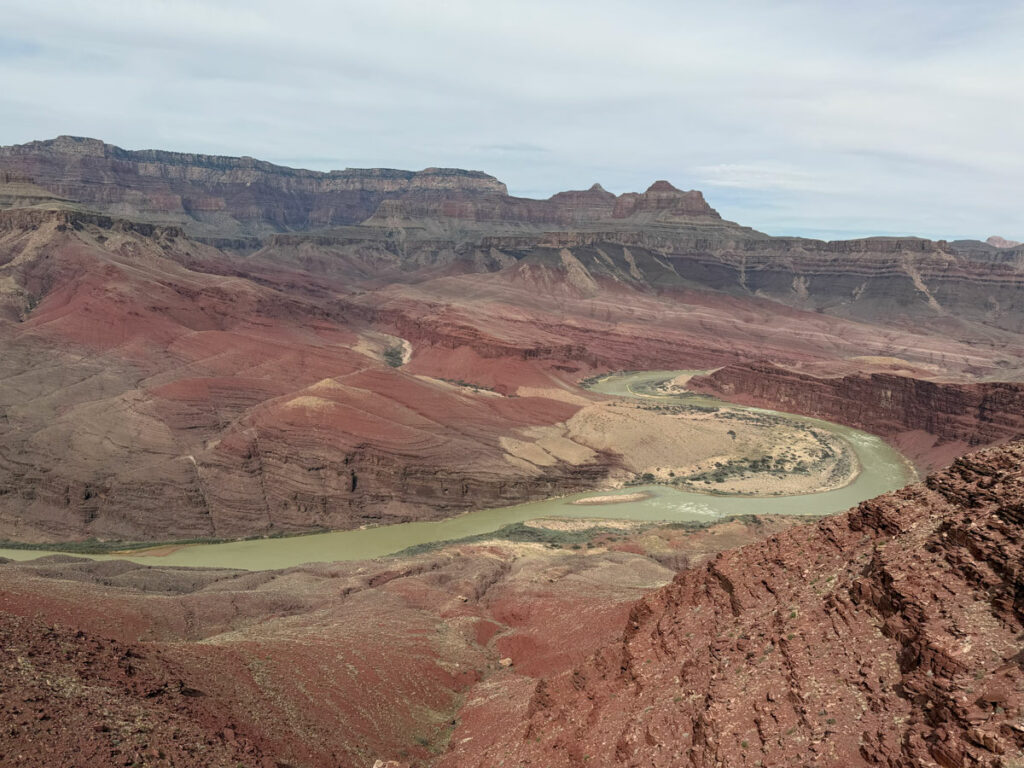
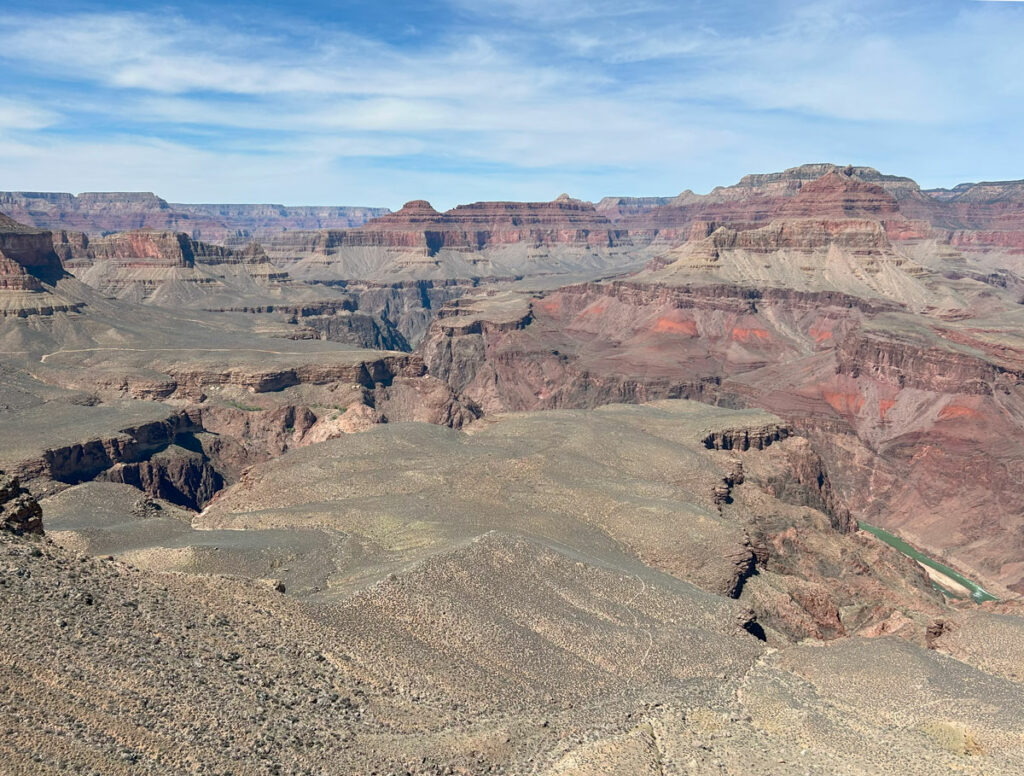
The viewpoint marked Escalante View 2 on my map is probably my favorite of all. Once atop this point, you have a sweeping view northeast toward a scenic s-curve in the river (the cover photo for this post), and an equally grand southwest view deeper into the canyon. Make time to stop here! My heart is getting a little fluttery just remembering that moment.
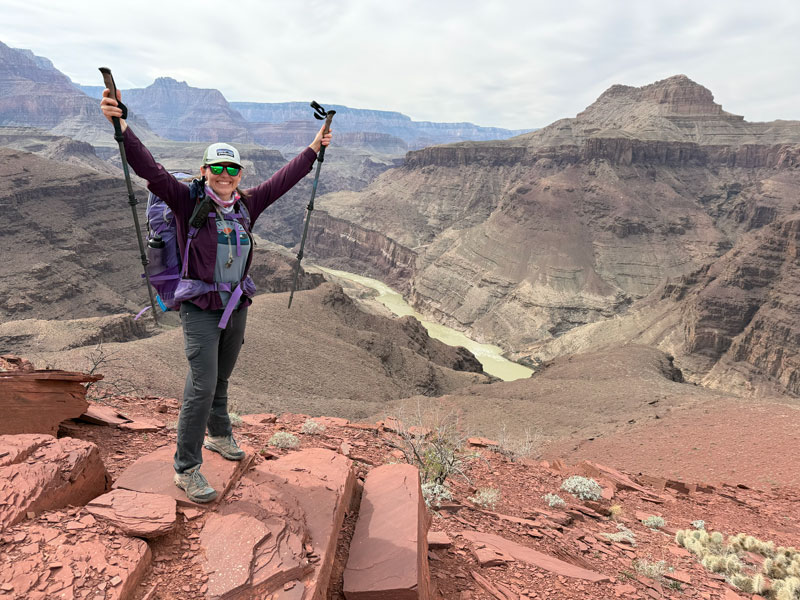
From here, the trail continues to follow the contours of the canyon and heads away from the river once again to get past the Escalante Creek drainage. By the time it comes back to the river, you’ll find yourself standing on the edge of another cliff that drops dramatically down to the river. Again, the trail won’t come very close to the edge, so you need to make a little detour to see this heart stopping view.

Seventyfive Mile Creek
The next drainage you’ll need to get past is Seventyfive Mile Creek, which is deep and narrow compared to the others. Again, you’ll head away from the river, and when you get about half a mile back, you’ll finally come to a spot that looks like you can get down into the drainage without dying.

Some will feel comfortable going down on their feet, others on their butt. Either way, it’s not too difficult an obstacle. A very short slide immediately follows, which is not to be confused with the much bigger, sketchier Papago Slide. You ain’t seen nothing yet!
Once down at the bottom of the drainage, it’s a pleasant half mile walk back toward the river in a scenic, shady slot canyon.

As the drainage opens up, you can go straight ahead to the river if you need water or a break. There’s also a fantastic beach a little farther down river that looks like a great camp if you have a permit for Cardenas Creek (BC9).
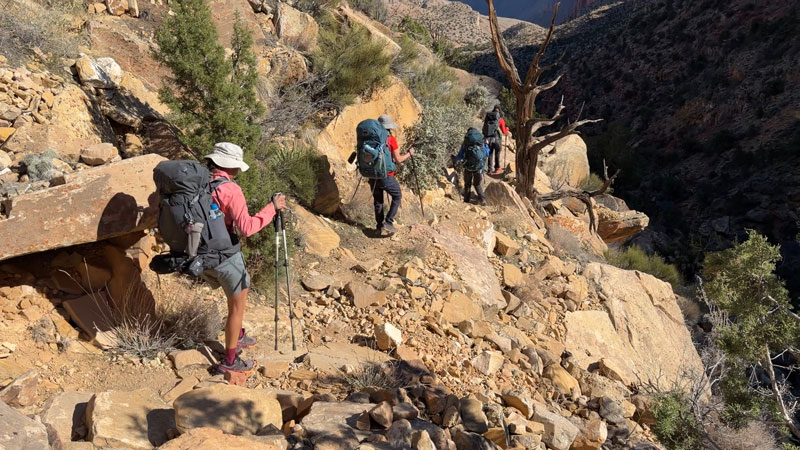
The next mile-and-a-half to Hance Rapids is going to seem like the longest, hardest part of the whole route. It’ll be slow going in spots, you’ll scramble, you’ll spend time route-finding, and you’ll face the infamous Papago Wall and Papago Slide. Make sure you have the energy, the daylight, the water, and favorable conditions for completing this part of the route. For reference, it took us a couple hours.
Ready?
The first half mile after Seventyfive Mile Creek, the trail rises above the river again to follow the contours of the canyon. You’ll have a great view of the beach there and probably feel a tinge of jealousy if you see anyone out there enjoying it while you head for the most difficult part of the route. Alas, there are obstacles to be conquered ahead!
This section of trail features a few small drainages to cross by scrambling down some rocks and back up again. Nothing too crazy. In fact, you may be so mentally drained from the anticipation of the Papago Wall and Papago Slide that you just want to get it over with already. Soon, my friend.
Papago Wall
When you arrive at Papago Creek, you can feel it. It’s go time. The trail heads down toward the normally dry creek bed where Papago Creek meets the Colorado River. A slightly sketchy move gets you off the rock and down into the wash.
To your left is the dry chute of a waterfall. Straight ahead is the Papago Wall. Yep, that’s it. Not too bad, right? Scramble up onto the first ledge on the other side to get a better look. It’s not immediately obvious where it is, but basically if you are looking at the dry waterfall, it’s to the right, beginning on the ledge. Two of us made it up the Papago Wall with packs on and no assistance. The others took their packs off for the last little bit and handed them up to the person above.

None of us thought it was that big of a deal. If you’re backpacking this route, chances are good you have the experience and the physical fitness for it.
Once at the top of the Papago Wall, it’s a little tricky to follow the route. Keep an eye out for cairns and check your GPS when in doubt. The trickiest spot above the wall is a skinny little rock chute that takes some upper body strength to get on top of it.
Truthfully, you haven’t even gotten to your biggest problem yet: the dreaded Papago Slide.
Papago Slide
It needs no introduction. When you get there, you’ll know it. A few curse words might escape your lips. Friendships could be ended right there. Basically, the Papago Slide is a massive landslide that you’re somehow supposed to go down in a controlled fashion without dislodging a rock onto your friend’s head.

For safety, it’s critical that you do not follow anyone too closely. EVERYTHING is loose. There is no completely stable footing, so you are going to have to go slowly and carefully down this beast. Most of us went down the first part on our butts. I chose to remain upright, relying heavily on my poles to control my descent.
It’s going to be a very slow, tense process. I could see my friend at the bottom lying on her back and yelling, “Never again!” Okay, but she obviously wasn’t thinking of those views she saw earlier. Worth it! The key is taking your time. And maybe some butt scooting, if needed.
Despite all that, we all made it down without injury. Woohoo!
Hance Rapids
Once we were back down by the river, it felt like a straightforward jaunt over to our beach camp. There were still some boulders to hike over, but everything felt pretty easy compared to what we just did. The anticipation of sunset, dinner, and another peaceful night on the shore of the Colorado kept a spring in our step. We made it!
The Red Canyon zone (BD9) starts right around where you come down the Papago Slide. At the first beach we came to, we dropped packs. It wasn’t quite to the junction with the New Hance Trail, but it was close. After exploring the entire length of the rapids, I found it to be the best camp spot around, so snag it if you can! I marked it on my map.

New Hance Trail
There comes a time on every Grand Canyon trip when you realize you gotta get out of there somehow. For us, the time had come. We read a lot of negative reviews about the New Hance Trail, so we were a little apprehensive about what lay ahead.
The New Hance Trail starts off with a slightly uphill hike up a mostly dry wash. Unlike most of the other washes you’ve seen up until this point, this one might actually have some water in it around a mile up. This water is not reliable, so make sure to speak with a ranger if you’re wanting to use it. Likely, they’ll tell you to fill up at the river and fill up again here.
This water was too good to pass up, so we all put a little extra in our packs. Beautiful, CLEAR water! With 3-4 liters each, it ended up being dead weight that we carried to the rim and poured out at home. None of us ran out of water on this perfect weather day.
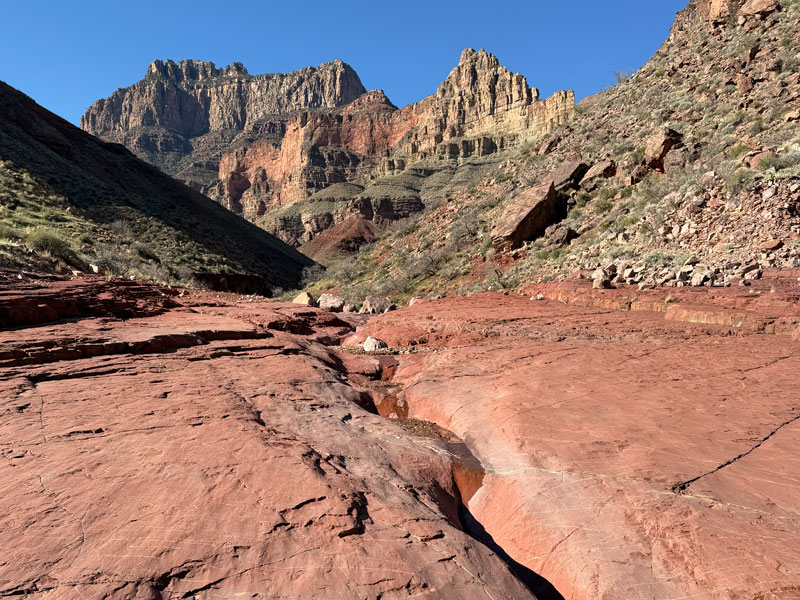
At about a mile-and-a-half from Hance Rapids, the trail leaves the creek bed and heads—you guessed it—straight the heck up. There aren’t that many breaks from the relentless uphill climb, but we found the trail to be well-defined and easy to follow at this point.
Plus, the views back down Red Canyon make it rewarding!

After two miles of straight the heck up, you’ll get a little reprieve as the trail stays at a relatively steady elevation for almost a mile. However, this section introduces new problems because there are several places where rockfall has obliterated the original trail. Poles, cairns, and steady footing will get you through.

The trail then rejoins the creek bed, which is dry at this point, and follows the path of the creek for about three-quarters of a mile. If you have been paying attention to your GPS route at all, you know the steepest part is yet to come. The tight cluster of switchbacks and elevation lines that are super close together are enough to make your palms sweat.
Five miles from where you left Hance Rapids, and just under two miles from the top, you find yourself below the most intense climb of the hike. Just a reminder, switchbacks are your friends, so don’t let them get to your head. You got this! You’re a Papago Slide survivor!
Several reviews said this part is hard to navigate. We didn’t find it to be much of a problem, but do look for cairns and branches/boulders blocking incorrect routes. As always, keep an eye on GPS if needed. The trail does have some loose, flat rocks, as well as some rather big steps up large boulders.

As you near the rim, you’ll notice more trees and more distant views. The ranger mentioned that the New Hance Trail tends to melt out before other trails, so she was confident snow would not be an issue for us. We did not see a single patch.

After what seems like endless climbing and multiple “false rims,” there it is. The top. I have hiked into the Grand Canyon on multiple occasions, and I can say I never get tired of that accomplished feeling I get when I crest the rim. Wooooohoooo!
Get that thumb ready. Time to arrange a ride back to your car.
Map & Directions
Location Grand Canyon National Park, South Rim, Tusayan, Arizona
Google Maps Lipan Point
Fees/Passes There is a fee to enter Grand Canyon National Park, or you can use your America the Beautiful Pass. If you plan to camp below the rim, you must have a backcountry permit from Grand Canyon National Park. You can join the lottery to get a time slot for early access to the permits. Otherwise, you’ll have to wait until the remaining permits are released. Visit Recreation.gov to get all the information about obtaining a permit.
Trailhead Facilities No restrooms available at Lipan Point, but there are vault toilets available at Grandview Point and Buggeln Picnic Area. Water refill stations and flushing toilets available at the Desert View area near the East Entrance.
Preview this Hike
Part 1
Part 2
Recommendations for you
Grandview Horseshoe Mesa Loop | Grand Canyon NP
South Kaibab to Hermits Rest | Grand Canyon NP
Nankoweap | Grand Canyon NP, North Rim
Leave a Reply