Clouds Rest and Half Dome Loop
TRAIL STATS
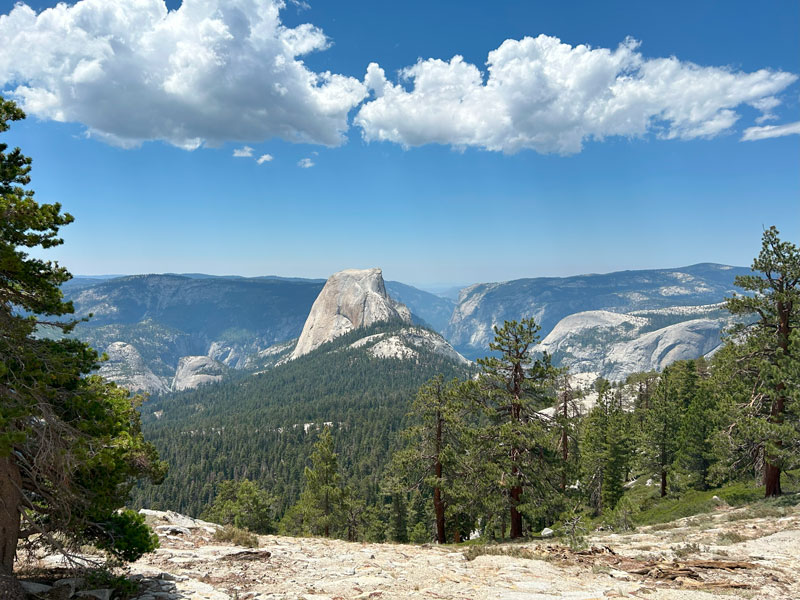
This loop in Yosemite National Park visits two of the most popular summits in Yosemite: Clouds Rest and Half Dome. Along the way, you’ll pass through verdant meadows, gaze at craggy peaks, visit serene alpine lakes, and have unsurpassed views of Yosemite Valley. This is not for the casual hiker or the faint of heart. The narrow ridge leading to Clouds Rest, and the cables leading up to the summit of Half Dome can be unnerving to those afraid of heights, and the hike itself is long and strenuous. Those with excellent physical fitness and a spirit of adventure will be rewarded with an exhilarating adventure of a lifetime.
Trail Description
Clouds Rest and Half Dome are two of the best and most popular destinations in Yosemite National Park, and a loop including both is a backpacker’s dream. This loop can be approached from multiple trailheads. We chose Cathedral Lakes Trailhead for its beauty and to add some mileage onto our trip. Other popular trailheads for this itinerary include Sunrise Lakes, Happy Isles, and Glacier Point. No matter which one you choose, you will need a wilderness permit, and you will need to add Half Dome onto the permit when you pick it up. (More on permits at the end.)
Cathedral Lakes Trailhead
The Cathedral Lakes Trailhead is located next to the Tuolumne Meadows Visitor Center. The ranger told us that the western end of the parking lot is intended for overnight stays, but that parking anywhere in there is fine. There were plenty of bear boxes at the trailhead to stash food and smelly items that you aren’t planning on taking with you.
From the trailhead, you’ll get onto a connector trail that will link you to the John Muir Trail (JMT). This is basically a nuisance hike, which follows along Tioga Road before taking you up to a junction with the JMT. Just before you hit a half mile, you’ll see cars parked along the road and wish you could’ve parked there. Save your disappointment for the hike back when you’ll really be wishing your car was there.
The trail soon bends left to connect with the JMT, and a sign marks your entrance into the Yosemite Wilderness. Ahhhhh. . . things are about to get a lot better.
John Muir Trail
Once on the John Muir Trail, you’ll start trending upward at a moderate grade. If you’re not used to the elevation, this can really take the wind out of you, but you’ll have the shady pines and water crossings to keep it pleasant.
I know you just barely filled up all your water at the Tuolumne Wilderness Center, but there’s a spring gurgling out of the ground at about two miles in that probably has the best tasting water on Earth. Eat your heart out, Arrowhead! We learned this hot tip from the ranger when we picked up our permit, so we saved some empty bottles to fill here. Bonus is that it has a picture perfect view of Fairview Dome.
Cathedral Lakes Trail (optional)
After three miles, you’ll come to the junction with the Cathedral Lakes Trail. This trail is only half a mile long, and a diversion to Cathedral Lakes is well worth it if you have the time. It’s also your first camping opportunity, if you’re so inclined.
Note that the Cathedral Lakes Trail has been moved to protect the meadow, and our maps showed the wrong location. It’s fine if you’re heading in from the trailhead because you’ll come to the new trail first. However, if you’re looking for it on the way back, you might get to the junction shown on your map and be like, “Where is the trail?!?! I know we saw it on the way in.” If we had read the laminated papers that were being held down with a rock there, they would have told us the trail was relocated. Instead, we burned almost another half mile going back and forth looking for the trail. Don’t be like us. There are obvious signs at the new trail junction, so you can’t miss it.
Continuing on the JMT
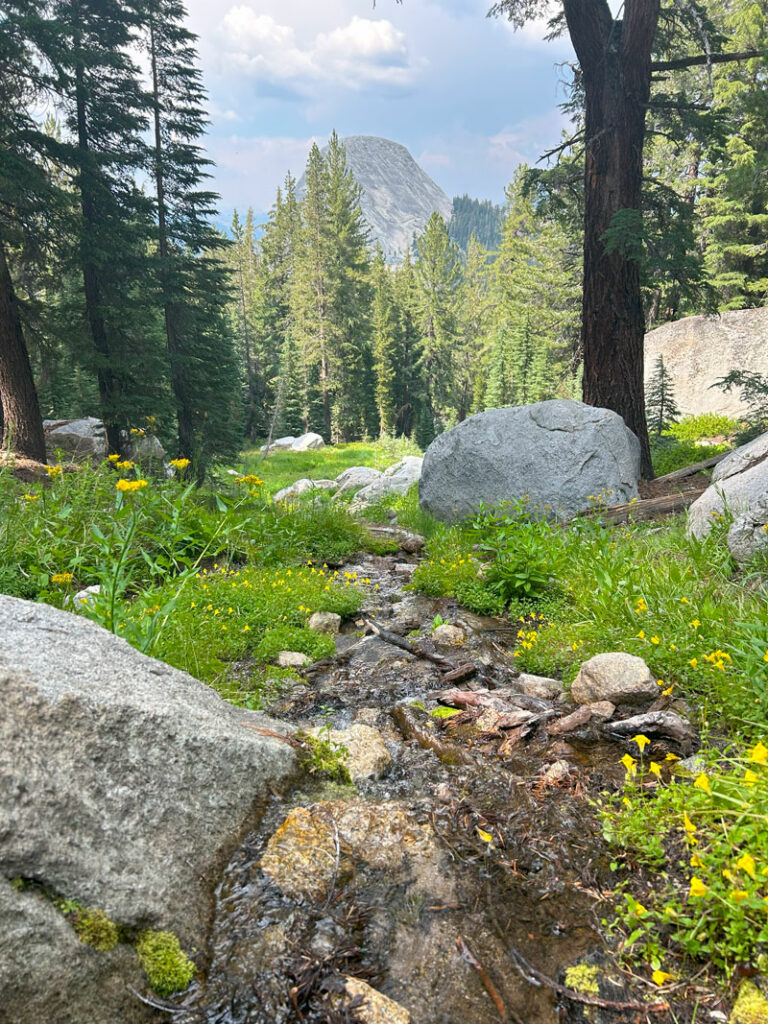
As you continue on the John Muir Trail, the uphill eases up a bit, and you’ll eventually find yourself in possibly the most idyllic meadow you have ever seen. We went in July, and there were oceans of wildflowers in an impressive array of colors spread out before us. In the distance, the meadow was framed by jagged, white peaks and deep green pines.
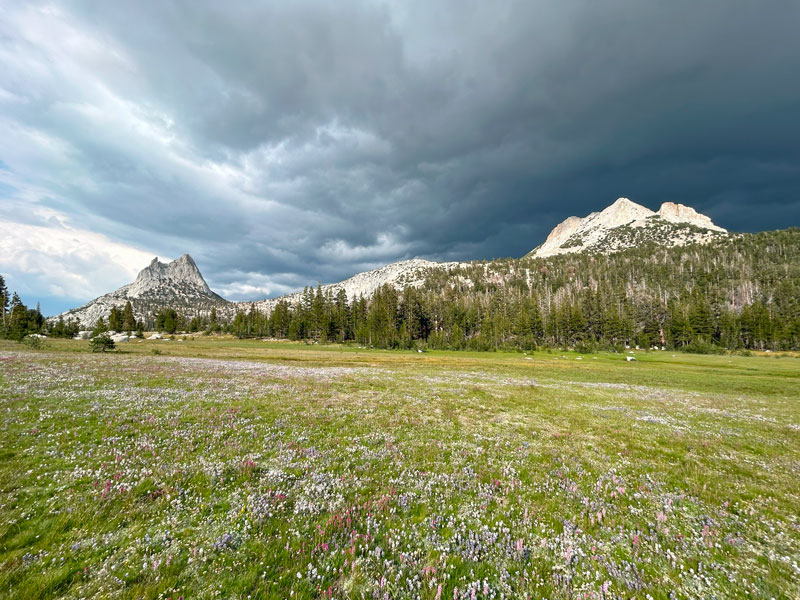
If you’re lucky, some storm clouds will roll in and make it all the more dramatic. Okay, yeah, we got dumped on, but it was worth it!
Beyond this meadow, you’ll go over a small pass into another beautiful meadow! It’s beautiful meadow overload! Here, the trail starts to flatten out a bit as you travel the last mile and a half into Sunrise High Sierra Camp.
The Sunrise High Sierra Camp is operated by a concessionaire and requires reservations. We were planning on dispersed camping, so we didn’t do much research into this option. When the smell of dinner came wafting over to us, though, we were seriously questioning our choices. It was 7pm, we were hungry, and we still had a mile or two to Sunrise Lakes. The camp had bathrooms, legit tents, and a dinner tent full of people eating. They sure did look happy.
The whole reason we wandered into the camp was because the Sunrise Lakes Trail was not where the Garmin said it was. A few nice people tried to help us out, but no one there really knew where it was either. So we went back onto the JMT and followed it a little farther until we reached the signed junction. Every major trail has a sign, so when in doubt, keep going.
Sunrise Lakes Trail
The first part of the Sunrise Lakes Trail actually travels through a dispersed camping area with established sites for backpackers. There’s also a bathroom with TP and hand sanitizer, as well as bear boxes for food storage. We didn’t realize this first-come, first-served campground was an option for us, so we soldiered on to Sunrise Lakes.
The trail went up for a while, but then started trending downward toward upper Sunrise Lake.
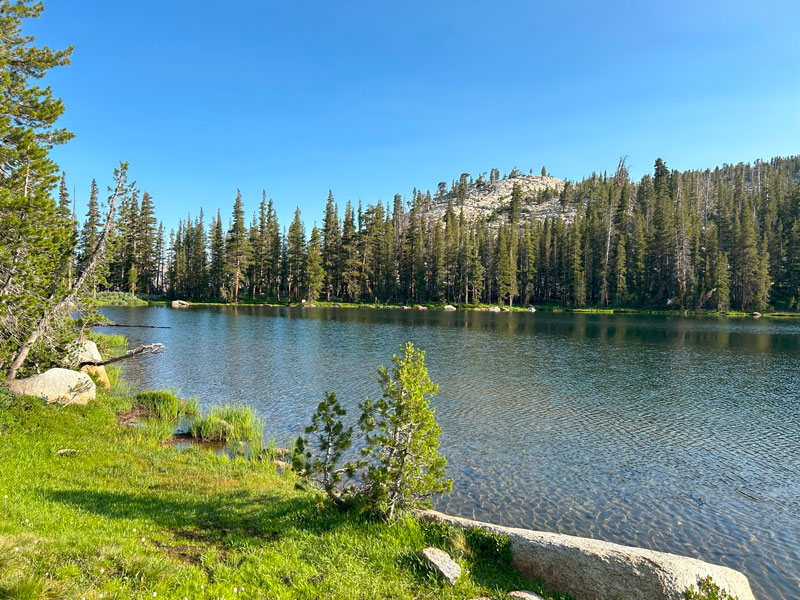
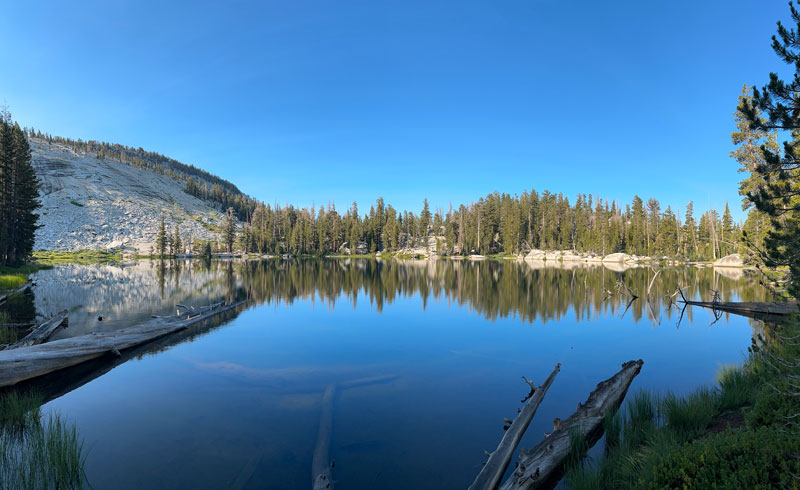
Sunrise Lakes
When we arrived, we had neither the energy nor the daylight to continue to the other lakes, so we looked for a campsite. You are supposed to camp 100 feet from the trail and water sources, but we could only find one established site, and it wasn’t quite far enough from the trail. It seemed like our only option given the vegetation everywhere else, so we took it.
Later we found out that the Park Service’s website states the following: “Camping is permitted within 100 feet of a stream, trail or body of water provided that a well established campsite exists and terrain permits no other options.” Whew!
There was no one else there, and it was a quiet little slice of heaven.
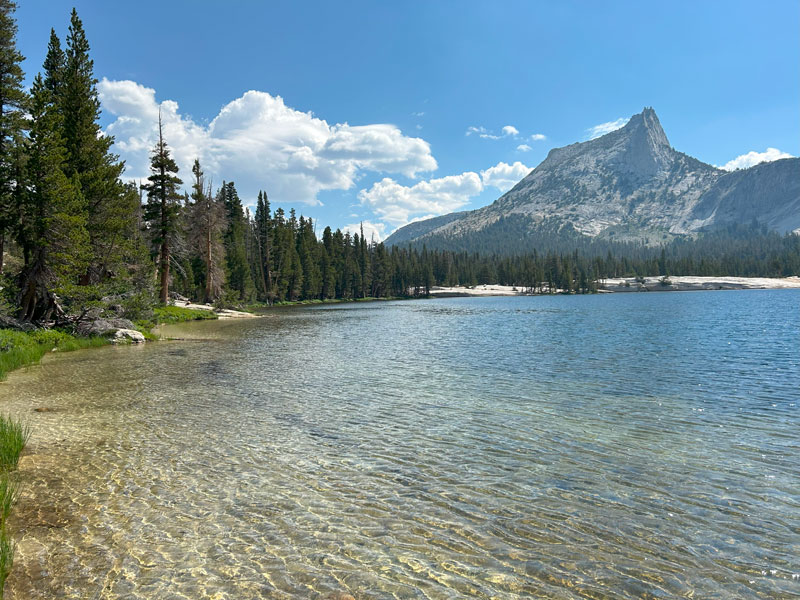
The next morning, we enjoyed a little view of the lake and then continued on toward the other lakes. The middle lake looked like it had a lot of places to camp, and the lower lake looked like it had a few spots, too. We saw some tents in the distance and were secretly jealous that they were probably still blissfully resting. Not us, though. We had places to be, and Clouds Rest was on our radar.
Clouds Rest Trail
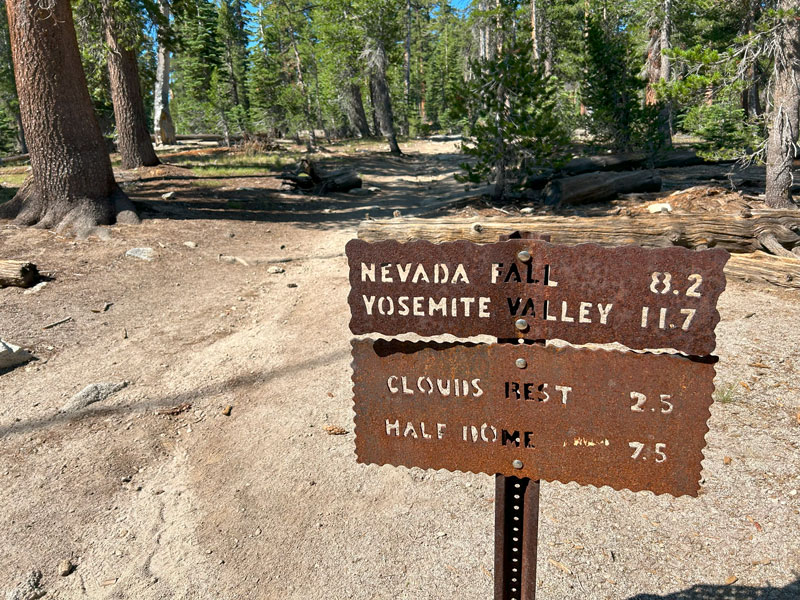
Almost half a mile past the last lake, we hit the junction for Clouds Rest Trail and turned left toward the summit. A sign listing some of the best spots in Yosemite ahead lets you know things are about to get good.
Clouds Rest is a popular day hike from the Sunrise Lakes Trailhead, which is just 2.5 miles away from here. So, you’ll be sharing the trail with a lot more people along this section. The trail heads down for a short while before flattening out and coming to a pretty lake about one mile from the junction.
Enjoy a little bit of rest and relaxation because you’re about to go nonstop to the top.
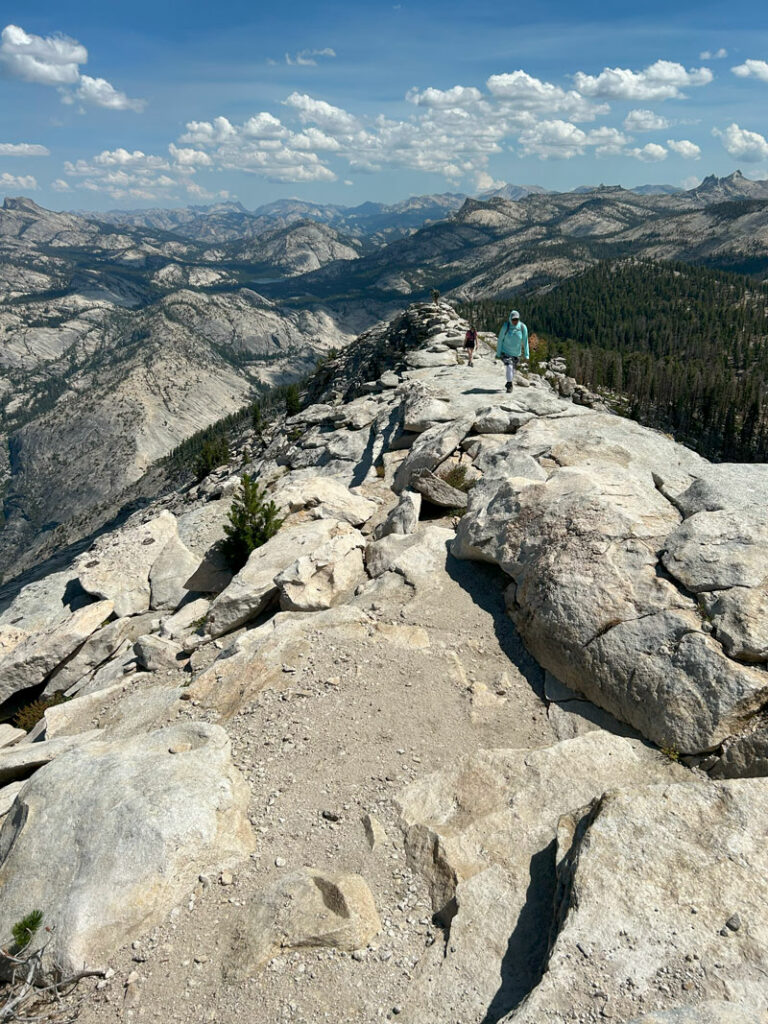
Fortunately, approaching Clouds Rest from this side is a nice hike, and you’ll only gain about 1000 feet from here. Don’t get complacent, though, because it finishes off with a narrow ridge that Clouds Rest is famous for. Don’t worry, it’s only a drop of like 4,000 feet down to the valley below.
The National Park Service’s map shows a trail that bypasses the summit, but why would you do that? We didn’t check it out, so we have no idea what it’s like or if it even exists. But seriously, you’re going to the summit, right?
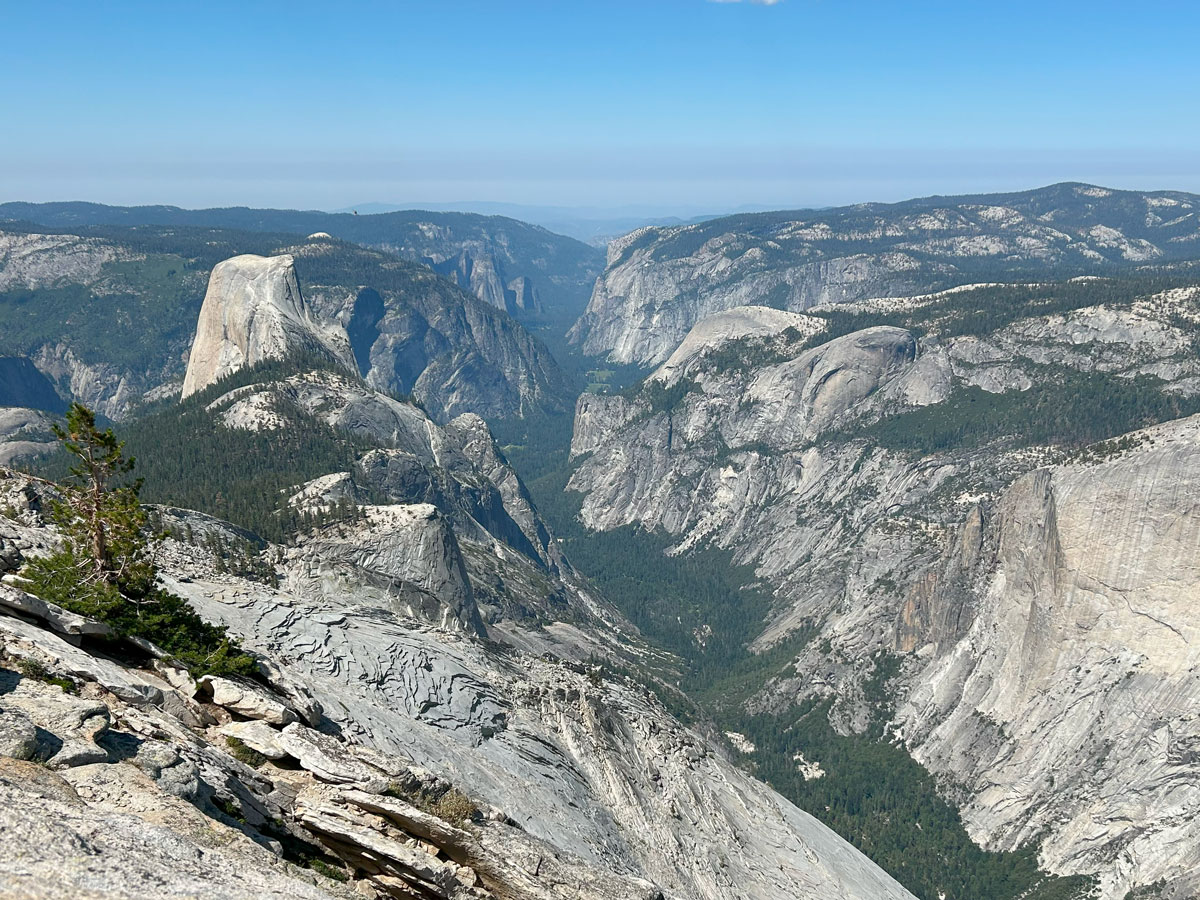
Clouds Rest Summit
Once at the top, the views of Half Dome and Yosemite Valley are sublime. Have a seat and stay a while! But if clouds actually start to rest up there, it’s time to get a move on. Afternoon storms can materialize quickly in the summer.

When you’ve had your fill of views (is that even possible?), keep going straight across Clouds Rest to find the trail that goes down the other side. This trail goes down a crap ton of stairs and then transitions into a bunch of relentless switchbacks. Needless to say, we were glad we hiked up the other side.
After dropping 2500 feet, you’ll reconnect with the John Muir Trail. Turn right if you’re heading to Half Dome or left if you’re done with this place and ready to go home. That was a joke, people. Of course you added Half Dome onto your permit, right?
If you’re looking to camp right away, there’s a sweet campsite next to the Clouds Rest and JMT junction. Even if you’re not camping, the cold water of Sunrise Creek sure feels good on tired feet. Just sayin’. We were planning a predawn summit of Half Dome, so we decided to keep going.
It’s a half mile from there to Half Dome Trail, and you’ll enjoy great views of it along the way.
Half Dome Trail
When you get to the Half Dome Trail, take a right. If you’re going in the evening like we were, there won’t be many people on the trail. If you’re there in the morning or middle of the day, though, you’ll have plenty of company.
The trail heads steadily uphill from there. If you’re planning to camp near Half Dome, be aware that camping is only permitted on the right side of the trail (heading uphill), and you can’t camp on Half Dome. The topography is slanted in most places up there, but there is a saddle about a mile and a half up the trail where you might be able to find a spot.
Falling Trees
We tromped over several fallen logs and found a nice clear spot on a bed of pine needles. During the next hour of relaxing in our tent, we heard what sounded like a tree falling over. And then another. And then another. That’s when we realized we might be in danger camping among all those fallen logs. We looked outside of our tent to realize that about 30% of the trees in the area are completely dead. Aaaaaand there were a couple close enough to us to crush our tent. I wouldn’t be able to sleep if we stayed, so we looked for a safer spot.
As we explored a little farther, we realized we were close to the most magnificent view where the saddle dropped off into the valley below. Half Dome and the sunset in the same view? Yes, please!
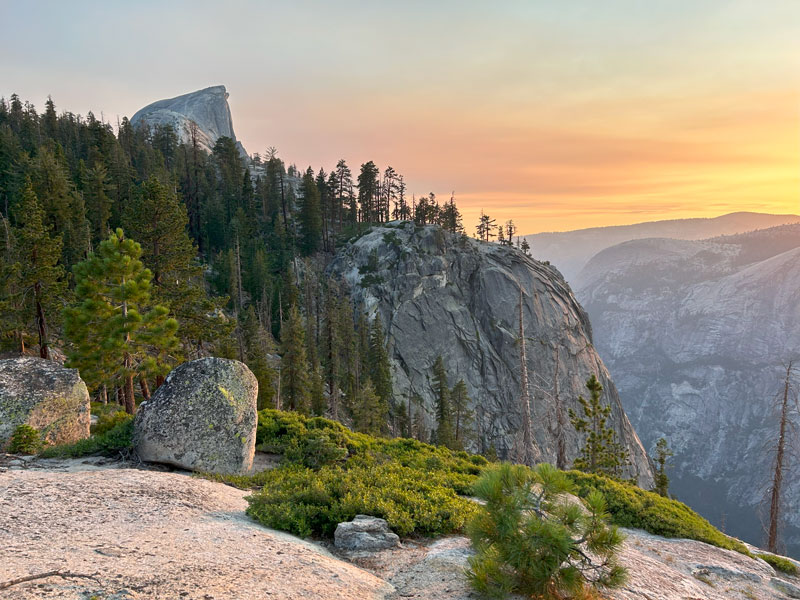
We found a place that we felt was safe and protected from the wind, set up camp, and then took our Mountain House dinners out to the precipice to enjoy the sunset. All alone at this magnificent spot in Yosemite. It was heaven.
Mama Bear
As the sun dipped below the horizon, we spotted a mama bear and her cub heading right toward our tent. Did you know bear spray is illegal in Yosemite? The only thing to do was make a lot of noise and hope mama bear would lead her cub away to safety. We never saw her again after that.
At this spot, our elevation was under 8,000 feet, so it would be the lowest camp of our trip. We definitely felt the difference on that warm night in July. The warmth made it hard to fall asleep as quickly as I would have liked, but Half Dome was calling. We would attempt that pre-dawn summit on no sleep if we had to. Okay, there was a good chance I’d be going alone, but I was going.
With one mile to the summit and one hour until sunrise, we headed up the trail with our headlamps and a few other intrepid souls.
Half Dome Subdome
After going through a bit more forest, we arrived at the subdome. There’s a bear box there to store food or scented items that you don’t want to haul to the summit. This is also where there’s normally a ranger checking for permits, but there was no ranger on duty when we arrived, so we just headed up.
People, the subdome is no joke. You start up those stairs, and you just keep climbing. Stairs, stairs, and more stairs. At least it’s a well-maintained trail, right? It’s likely you’ll be taking frequent breaks on the way up, and as the sun begins to light up the landscape, you might find yourself wondering if you’ll even make it before sunrise at all. Stop and take in the view every now and then just in case.

But don’t give up. Fun fact is that the sun won’t actually come up over the horizon exactly at the listed sunrise time. It still has has to get above the distant mountains, so we had an extra 15 minutes or so.
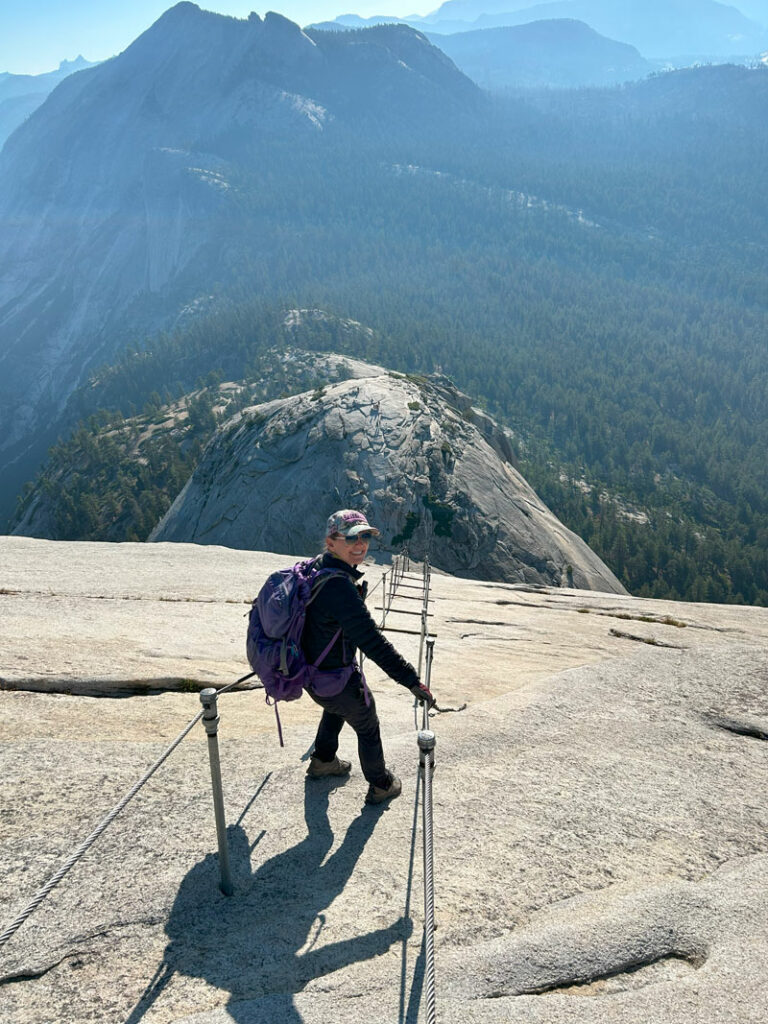
Half Dome Cables
There’s a certain feeling that overcomes you when you see those cables for the first time. Is it fear? Excitement? Maybe a mixture? When you see just how steep it is, there might be at least one split second where you’re wondering why you thought this was a good idea.
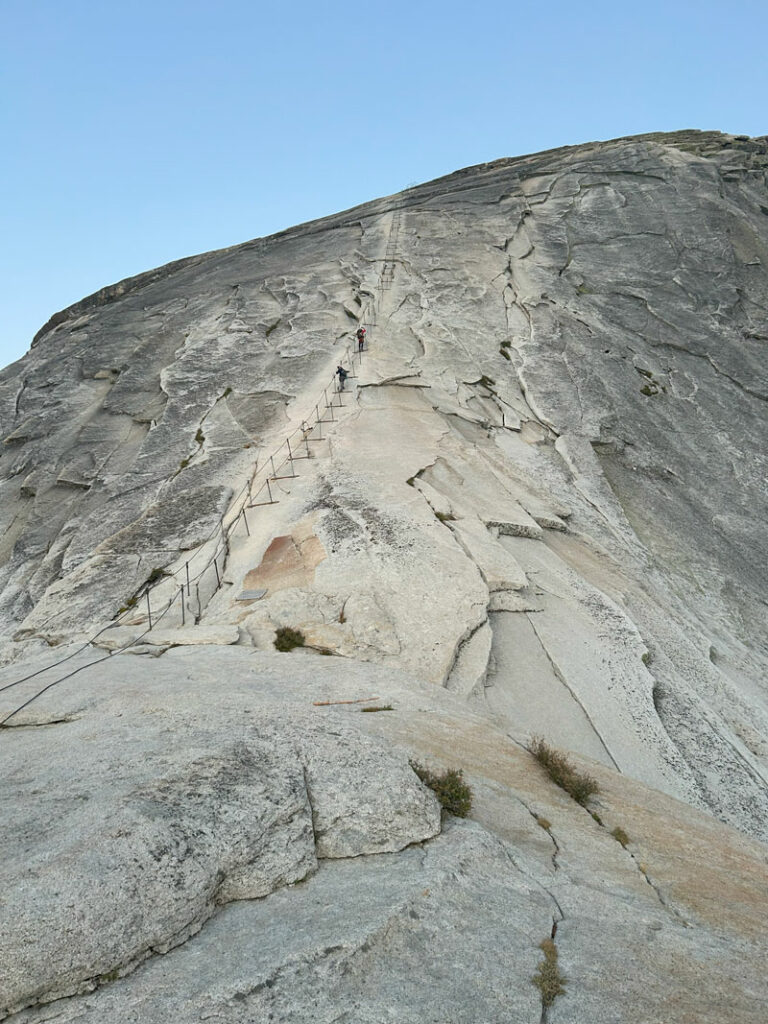
Since 225 of the daily permits for Half Dome are for day hikers, and only 75 for backpackers, the most crowded time of day on the cables is shortly before noon when the day hikers who started at dawn start arriving. Okay, I totally made that up, but last time I did this hike, I was a day hiker, and we had a conga line of people going up. This time, the cables were almost completely empty just before sunrise. It was a beautiful sight.
At this point, it was a race against the sun, and we hustled up those cables as fast as we safely could. Which, it turns out, wasn’t that fast because we were already exhausted from that blasted subdome! With a little persistence, stopping every few boards along the way, we found ourselves at the top before the sun came over the horizon.
There were at least a dozen other crazies up there waiting for the big event, and we set up a time lapse to capture the glorious scene. Pure magic. Then we sat next to the sheer edge to watch the sun slowly fill Yosemite Valley with light.
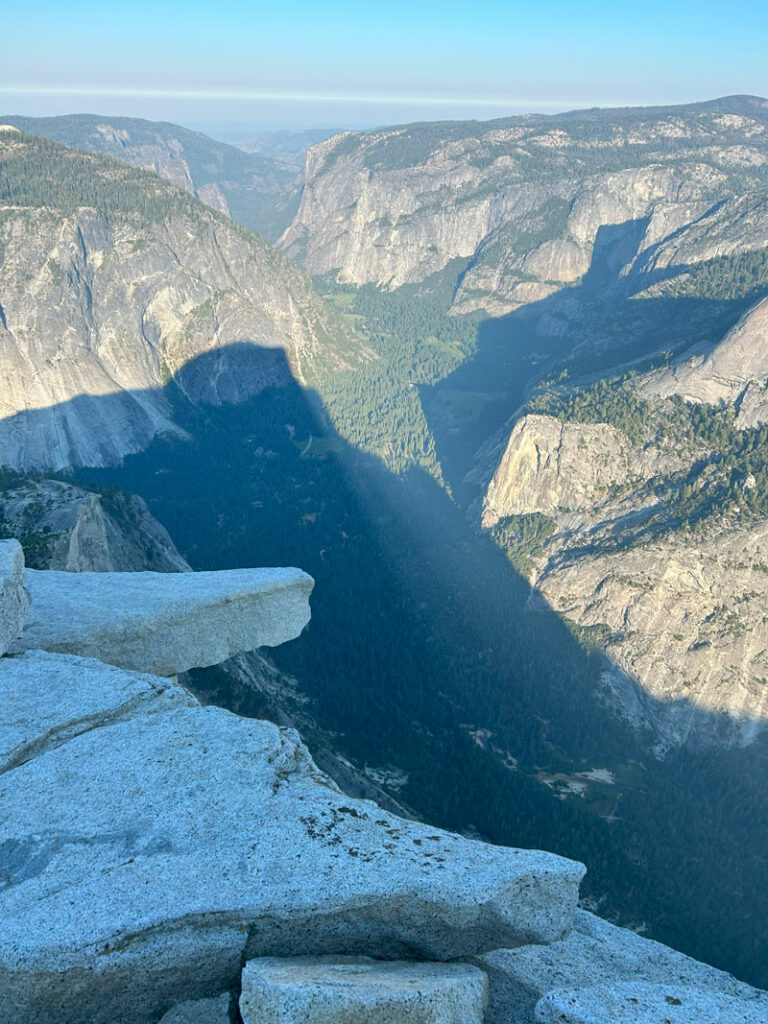
After about an hour, we knew we needed to get going if we were ever going to make it back to Sunrise High Sierra Camp that day. It was hard to say goodbye to our perfect little perch.
Descending the Half Dome Cables
We headed back to the cables and had another one of those “We’re really doing this?” moments. From this vantage point, the cables look like they just go over and fall off the edge. Yeah, we’re doing this.
Luckily, rush hour still hadn’t started yet, so we only had to pass a couple people along the way. The best thing to do is communicate with the person below and make a plan as to who will stop, who will pass, and on which side. The people coming up are usually glad to stop and wait for you to pass.
My strategy was mostly to turn backward, grab the cable on one side with both hands, and slide down along it while going down step by step. The person in front of me chose to turn backward and grip one cable in each hand. You just have to find the strategy that works best for you.
Tips for the Half Dome cables
Avoid bad weather DO NOT go up if there is any sign of bad weather. These cables have been here for more than a hundred years, and Half Dome has been here millions more. You’ll likely have another chance, and I want you to live to see another day. Accidents are rare, but a disproportionate number of them happen when the rock is wet.
Wear good shoes You’ll want a pair of hiking shoes that has good tread and will be reliable on the steep rock face. Plus, it’s a long hike, so this is just good common sense.
Bring gloves You’ll likely be gripping those cables for dear life, and you want a firm and reliable grip. Be sure to haul the gloves out with you.
Take your time The best way to make sure you have enough stamina is to rest often. There are boards to stand on along the way, and you can stand on the poles where there is no board. A good strategy is to wait until the person in front of you has left the next board before continuing. That way, you’ll have somewhere to rest once you leave the board you’re on.
Clip in Most people do not clip in, but if you have any concerns, there’s no shame in it. Even though I know the cables are well within my physical ability, there’s no escaping the real risk of severe injury or death if you lost your footing and grip. I have never clipped in, but I always see people who do. If you choose to clip in, you will have to unclip the carabiners and reclip them at each pole.
Well, that was a morbid but necessary discussion. Sources vary on the statistics, but most say at least 20 people have died on the cables. That’s a relatively small number compared to the number of people who have gone up there, but you still have to respect the risk involved and plan accordingly.
Return Hike
Once you’re down off the cables, you’ll get that feeling of triumphant victory because the hardest part is behind you. Or is it? We still had a lot of miles and elevation planned for the day, and we clearly didn’t know just how tired we already were.
We retraced our steps down the Half Dome Trail back to the junction with the John Muir Trail and turned left. The JMT would take us all the way back to Sunrise camp.
As you follow the trail along the south side of Clouds Rest, you enter a burned area where the only shade is the occasional fat tree trunk. Every single tree is dead. All of them. So you’ll have to hop over a few logs as you slowly make your way higher and higher. Sunrise Creek follows the trail for a while, but eventually it’s just you, the bushes, and the mountain ahead. This section lasts an annoyingly long time, and if it’s warm out, it’ll be a sweat fest as you ascend back up into the higher elevations.
Higher up, you’ll have opportunities to take in the view and get a glimpse of living trees coming up ahead.
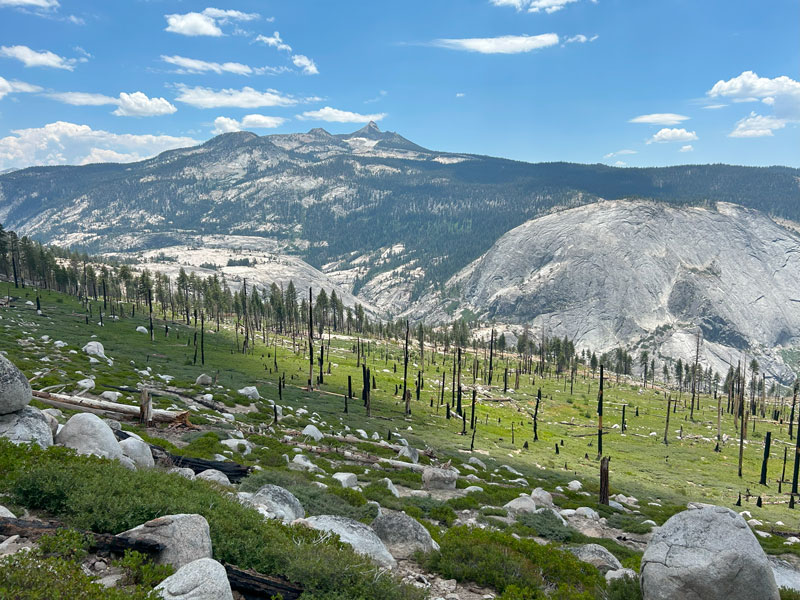
Keep going, and you’ll eventually be back in the forest. Ahhhhhh. Oh wait, don’t get too comfortable. Up ahead, the switchbacks start in earnest, but there’s a small stream before then where you can cool off, refresh, and get ready for the climb.
This is the last bit of the 2500 foot ascent from the low point where you left the Half Dome Trail to the top of the pass just above these switchbacks. Once you go over the pass, it’s a couple more miles, mostly downhill, into the Sunrise High Sierra Camp.
Sunrise Backpackers Camp
At this point, we had been hiking for around 12 hours and were ready to call it a day. We weren’t sure what the deal was with the dispersed camping next to the fancy camp, but it appeared we could just find a site and claim it. Turns out, you can camp at the backpackers campgrounds next to Glen Aulin, May Lake, Sunrise, Merced Lake, and Vogelsang High Sierra Camps if you have a valid wilderness permit. Score!
We set up the tent, napped in the pleasant breeze, woke up to put on the tent fly, and then slept for another eight hours. Half Dome can do that to you. The next morning, we filled our water at the nearby stream, although we did read that water is available when the High Sierra Camp is open. We just weren’t sure where it was, and the stream was so convenient.
From here, you’re almost done. Just retrace your steps back through those beautiful meadows and back to your car.
Getting a Permit
Just to get into Yosemite National Park during peak hours in the busy season requires a ticketed entry pass. However, if you have a wilderness permit for anywhere in the park or a permit to day hike Half Dome, you do not need a separate pass to enter.
Wilderness Permits for Backpacking
All backcountry camping at Yosemite National Park requires a permit year round. To get a permit that includes Half Dome, you have to start at one of the following trailheads:
- Happy Isles to Little Yosemite Valley
- Glacier Point to Little Yosemite Valley
- Happy Isles past Little Yosemite Valley
- Sunrise Lakes
- Cathedral Lakes (our choice)
- Rafferty Creek to Vogelsang
- Mono Meadow
At the time of reservation, you will have to select your planned camping area for each night of the permit. However, the ranger told us that we were not obligated to follow our planned itinerary, and the only things set in stone are the start date, the number of people, and the starting trailhead. So don’t let your cart expire while fiddling around with your itinerary. Just pick something reasonable, and you can go back and change it later or not follow it at all. My suspicion is that the rangers just want to know you’ve thought it out.
Once you purchase the permit, you will need to go to one of the Wilderness Centers to pick it up before your trip. If you’re arriving after 11AM on your start date, be sure to indicate that on your permit so they don’t give it away to walk-ups. At the time you pick up your permit, you can add on Half Dome for an extra fee (so long as you’re starting at one of the trailheads listed above). You can also rent a bear canister in case you’re camping outside of established campgrounds. For one of our nights, we used the backpackers campground next to the Sunrise Lakes High Sierra Camp (first come, first served – no extra charge), and it had bear boxes and restrooms available.
Advanced Lottery Sixty percent of all wilderness permits become available 24 weeks in advance by lottery on Recreation.gov. The trailheads that include Half Dome are the most popular, and it’s likely that all permits for those trailheads will be claimed during this time.
7 Days Advance The remaining forty percent of wilderness permits become available 7 days in advance of your planned start date at 7AM Pacific on Recreation.gov. If you want to secure a permit, be logged in and ready to grab it promptly at 7AM. This is how we secured our permit, and I would recommend practicing where you need to click and scroll ahead of time. I have found using a desktop makes it faster. Available permits can be obtained on Recreation.gov up until three days before your planned start date.
Walk-up Within three days of your start date, any permits that are still available can be obtained at one of the Wilderness Centers. It’s almost guaranteed the popular permits that include Half Dome won’t be available. But there’s still hope! The Yosemite National Park website states that any unclaimed permits will be canceled and made available for walk-ups the day of the planned trip, but they caution that you should not expect to successfully obtain a permit this way. However, we heard from a guy at the top of Half Dome that he’s been getting his permit as a walk-up for years. He says the secret is to get to the Wilderness Center by 6AM, and you should be able to get any permit you want. We can’t vouch for this process, but it’s an idea to try if you’re desperate.
Half Dome Day Hike
Possibly the biggest challenge with ascending Half Dome is not the hike itself, but securing the permit. This is a very popular route, and day hiking permits for Half Dome are in high demand. Permits are good for up to 6 people, and there are a couple ways to get your hands on one.
Pre-season Lottery Before the season starts, a lottery is held to distribute the permits. Applications are accepted between March 1-31, and results are available in April. The nice thing about this lottery system is you can select a range of dates, so if you have flexibility, you can increase your odds of winning a coveted spot.
Daily Lottery If your bid for the pre-season lottery is unsuccessful, you can try the daily lottery. For this lottery, you apply at Recreation.gov two days before your planned hike, and you’ll be notified whether your application was successful later that night.
Map & Directions
Location Yosemite National Park, California
Fees/Passes Yosemite charges a fee to enter, or you can use your America the Beautiful pass. In addition, peak times require an entry ticket, wilderness permit, or Half Dome day hike permit for admission into the park. See the information under “Getting a Permit” for details.
Trailhead Facilities Toilets, water, bear boxes
Recommendations for you
Teton Crest Trail | Wyoming

Grand Canyon Rim to Rim | Grand Canyon National Park
Paria Canyon | Vermilion Ciffs National Monument
Leave a Reply